My recipes are meant to be shared and enjoyed. I welcome you to re-post my recipes and text. I ask only that you credit me and include a link to my blog if you post any of my content.

Tuesday, December 21, 2010

Korean Pickles


I'm always delinquent in updating the blog, but I think procrastination is part of my DNA.  Just as an FYI, I was born long past my due date and I've been a top-quality procrastinator ever since!!!  I could win procrastination contests.  If there were a procrastination event in the Olympics I'd be a gold medalist for sure.  I'm going to try to get caught up here because there has been some fabuloso food cooked in our kitchen lately that I want to share with you.  Maybe this New Year's Day my resolution will be to post more often ... or maybe next New Year's Day ...

The following recipe is from singleguychef.blogspot.com .  I've made these savory, crispy pickles twice now.  When I made them I reduced the amount of sugar and increased the amount of salt from the original recipe because in my home we prefer a salty pickle as opposed to a sweet pickle.

The most important thing about this recipe is that you need to use Korean cucumbers if you can possibly find them.  If not, use Kirby cucumbers (also called pickling cucumbers).  Regular cucumbers just don't have the proper snappy crispiness for pickling. 

Korean gochujang (hot chili paste) is available at most Asian markets.  You may see it with different spellings, such as gokujang.  I think it has something to do with the translation from Korean to English.  If the word looks similar, you probably have the right thing.  If you can't find gochujang, you can substitute a few squirts of sriracha sauce.  You've seen sriracha even if you don't realize it; it's that sauce in the squirt bottle with the rooster on the label and the green plastic top that's readily available at most every grocery, even at Wal-Mart. 

For the chili flakes you can use crushed red pepper flakes which are easy to find.  But if you're lucky enough to have an Asian market nearby that stocks Korean staples, use mild or hot Korean red pepper powder, depending upon your taste.  Korean red pepper powder is a lovely ingredient for recipes because it doesn't include the pepper seeds, so it gives you a nice, smooth texture.

These pickles are so easy and so full of flavor.  My mouth is watering just thinking about them!


Ingredients

1 lb. Korean cucumbers or Kirby cucumbers
1 teaspoon kosher salt
1/2 cup sugar
1/2 cup distilled white vinegar
1/4 cup water
1 teaspoon Vietnamese fish sauce
1 teaspoon grated fresh ginger
1 clove garlic, finely minced
1 tablespoon hot chili paste
1 teaspoon chili flakes

Cut cucumbers about ¼-inch thick (leaving on the skin) and sprinkle with kosher salt. Gently work salt through the cucumber pieces with your hand and let sit for 30 minutes. Then rinse quickly under running water and drain in colander.

In a large bowl, mix together sugar, vinegar, water, fish sauce, ginger, garlic, chili paste, and chili flakes. (If you prefer a pickle that is more salty and less sweet, add 1 teaspoon of kosher salt to this mixture and reduce the sugar to 1/4 cup.)  Add cucumbers and then transfer everything into a clean mason jar.

Refrigerate until ready to serve.

Makes about 3 cups of pickled cucumbers.

Sunday, December 12, 2010

My Catering Aspirations

My sis-in-law Leslie and bro-in-law Andy gave me the opportunity to prepare the food for a holiday party they had for their friends in their beautiful new home.  Andy was so kind to take these fabulous pics of the food.

Trio of Dips:

Sundried Tomato Dip (Recipe From Barefoot Contessa)
Tapenade and Feta Dip
Hummus


Baked Figs With Blue Cheese, Candied Bacon, Roasted Pecans, and Reduced Balsamic Vinegar:


Miniature Twice-Baked Potatoes Topped With Crispy Prosciutto:


Vietnamese Chicken Spring Rolls With Nuoc Cham Dipping Sauce:


Grape Tomatoes Filled With Smoked Salmon Mousse, Served on Salted Cucumber Slices and Drizzled With Lemon Caper Vinaigrette:


Stuffed Mushrooms (My Photo):


This was a wonderful opportunity to prepare food for a party.  I hope to have more catering opportunities in the future.


Tuesday, November 16, 2010

Time-Saving Double-Duty Prep: Recipes For Egg Rolls And Pot Stickers


Both of these recipes are from "The Take-Out Menu Cookbook," by Carla Snyder and Meredith Deeds.  It's one of my favorite cookbooks.  It's a good jumping-off point for dabbling in ethnic cuisines.  The recipes are easy to prepare and yield delicious results.  I've posted the recipe for Fried Rice from this cookbook before.  I recommend preparing the Egg Rolls and Pot Stickers at the same time because, one, they use many of the same ingredients so you can easily prep the ingredients for both recipes at once, and two, you can freeze the extras from both recipes to prepare later and have homemade Chinese takeout night anytime.

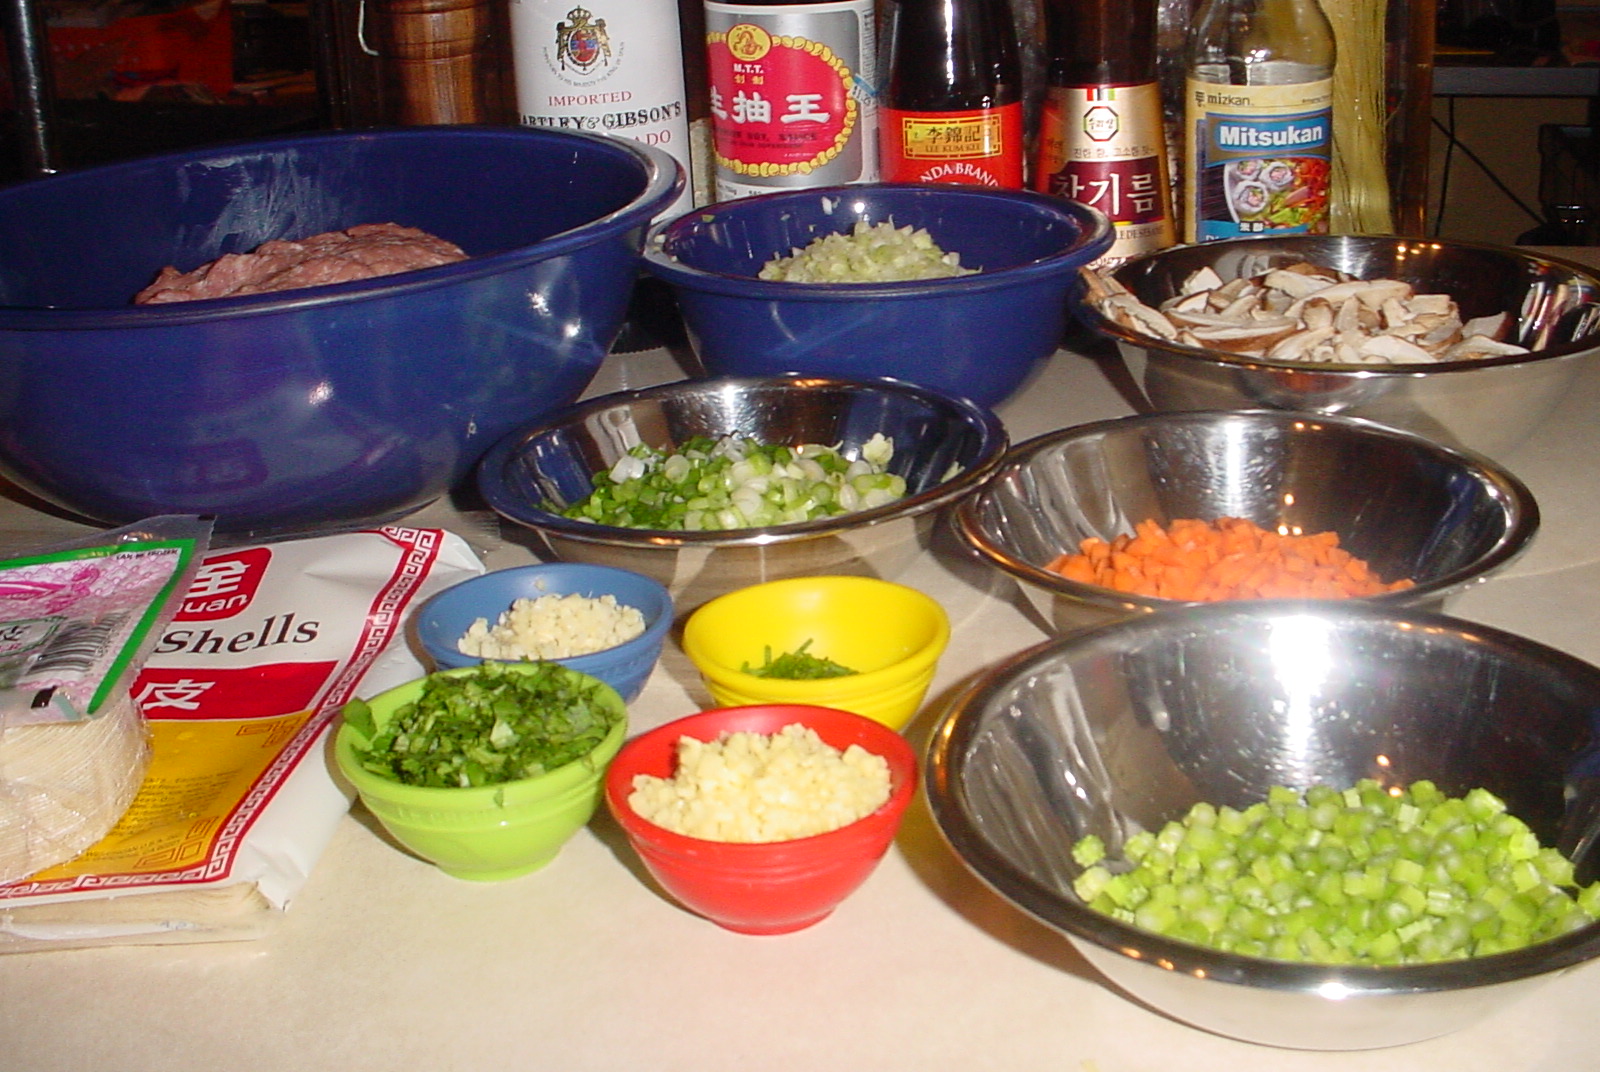
Don't let the long ingredient lists for these recipes deter you.  Most of the ingredients are easy to find.  Nowadays you can even find egg roll wrappers and dumpling wrappers at Walmart.  You might need to visit an Asian market for a few of the specialty ingredients, such as oyster sauce or toasted sesame oil.  Just go down the lists of ingredients for the two recipes, prepping each ingredient and portioning each into prep bowls.  Then you're ready to begin cooking.


EGG ROLLS

2 tablespoons oyster sauce
1 tablespoon soy sauce
1 tablespoon Asian toasted sesame oil
1 teaspoon sugar
1/2 teaspoon salt
1/4 cup vegetable oil
1 (1-inch) knob fresh ginger, peeled and minced
3 garlic cloves, minced (1 tablespoon)
1 bunch green onions, white and light green parts only, thinly sliced
1 rib celery, minced (1/2 cup)
1 carrot, minced (1/2 cup)
10 shiitake mushrooms, stems discarded and caps thinly sliced
1/2 head of napa or Chinese cabbage, thinly sliced (2 cups)
1 pound raw shrimp, peeled, deveined, and diced
1/2 pound ground pork
1 (16-ounce) package egg roll wrappers
1 egg, beaten
2 to 3 cups peanut or vegetable oil, for frying
Chinese mustard, plum sauce, or sweet chile sauce, for serving

Combine the oyster sauce, soy sauce, sesame oil, sugar, and salt in a small bowl and set aside.

Heat the vegetable oil in a large skillet set over medium heat.  Add the ginger, garlic, green onions, celery, carrot, and mushrooms and saute for about 3 or 4 minutes, or until they soften.  Add the cabbage and saute for another minute or two.  Add the shrimp and pork and cook, tossing and stirring vigorously, for about 2 minutes, or until they are cooked through.

Add the reserved sauce and toss to incorporate.  Remove from the heat and set aside until cool to the touch.

Cover the egg roll wrappers with a piece of plastic wrap.  Place 1 wrapper on a work surface with one point facing you.  Spread 1/4 cup of the filling horizontally across the lower third of the wrapper.  Fold the bottom point over the filling, tightening the wrap over the filling, and fold in the side corners.  Brush the top corner with the egg wash and roll up the wrapper tightly, sealing the roll closed.  Transfer the rolls as they are made to a parchment-lined sheet pan and cover loosely with plastic wrap.  Fill the rest of the wrappers in the same manner.

Preheat the oven to 200 degrees.

In a wide, heavy pot, heat 2 inches of oil to 360 degrees over medium heat.  Carefully add 4 egg rolls to the oil and fry, turning them with a slotted spoon after about 2 minutes as they brown on the bottom.  Fry on the second side for another 2 minutes, or until they brown.  Transfer the egg rolls to a sheet pan lined with a double thickness of paper towels.  Fry the remaining egg rolls in batches of 4.  When they are all browned, the egg rolls can be kept warm in the oven for up to 30 minutes.  (Kearby's Note:  When we prepared these, we heated 5-6 inches of oil to 360 degrees and deep fried the egg rolls.  We fried them for about 4-5 minutes, until golden brown.)

Serve hot with Chinese mustard, plum sauce, or sweet chile sauce.

MAKE AHEAD:  The egg rolls can be assembled but not cooked, covered, and refrigerated for up to 8 hours or frozen for up to 1 month.  Thaw at room temperature for 3 hours before frying.  (Kearby's Note:  We have frozen, thawed, and cooked leftover egg rolls and they were awesome!  Freeze in a single layer on the parchment-lined pan, not quite touching.  Once frozen, remove to a ziplock bag, label, and return to the freezer.)


POT STICKERS

1/2 head of napa or Chinese cabbage, finely chopped (2 cups)
1 pound ground pork
1/2 green onion, minced (2 tablespoons)
2 tablespoons soy sauce
2 tablespoons minced cilantro
1 (1-inch) knob fresh ginger, peeled and minced
1 tablespoon minced fresh chives, plus more for garnish
1 tablespoon rice wine or dry sherry
1 tablespoon Asian toasted sesame oil
1 teaspoon light brown sugar
1 teaspoon salt
1/4 teaspoon freshly ground black pepper
1 garlic clove, minced
1 (12-ounce) package dumpling wrappers or wonton skins, cut into rounds
1/4 cup peanut or vegetable oil
1 cup chicken stock

Dipping Sauce

1/4 cup soy sauce
2 tablespoons rice vinegar
1 teaspoon minced fresh ginger
1/4 teaspoon chile oil
1 garlic clove, minced


In a large bowl, combine the cabbage, pork, green onion, soy sauce, cilantro, ginger, chives, rice wine, sesame oil, brown sugar, salt, pepper, and garlic.  Work the ingredients with your hands until completely mixed.  Heat a frying pan over medium heat and fry a tablespoon of the mixture to check the seasoning.  Adjust the seasoning as necessary.

Cover the dumpling wrappers with a damp towel.  Place one wrapper on a work surface.  With a finger dipped in water, dampen the edges of the wrapper to help it adhere.  Place about 1 tablespoon of the filling into the center of each wrapper and fold it into a half-moon-shaped pouch.  Make 3 or 4 pleats at each edge to gather the dough around the filling, and then pinch around the top of the dumpling to seal it tightly.  Arrange the dumplings on a parchment-lined sheet pan.  Assemble the remaining dumplings in the same manner.

Heat a large frying pan with a tight-fitting lid over medium-high heat and add the oil.  When the oil is hot, add the dumplings to the pan and fry them on one side until browned, about 3 minutes.  Shake the pan to move them around during cooking and keep them from sticking.  Add the chicken stock to the pan and cover the pan tightly so that the pot stickers steam and cook through.  Cook for about 5 minutes, or until the liquid has evaporated from the pan.

(Kearby's Note:  It's important not to overcrowd the pan during the frying/browning step.  Fry in stages if necessary, removing any stuck-on bits from the pan and adding additional oil between batches if necessary.  After all pot stickers have been fried, then return all to the pan and proceed with the steaming step.)

To make the dipping sauce:  Combine the sauce ingredients in a small bowl.  Let the sauce sit for at least 5 minutes to let the flavors blend.

Transfer the dumplings to a heated platter, garnish with chives, and serve with the dipping sauce.

MAKE AHEAD:  The dumplings can be frozen, uncooked, for up to 1 month and cooked directly from the freezer.  Any unused sauce should be refrigerated and discarded after 2 days.  (Kearby's Note:  Use the same instructions for freezing these as the egg rolls.)

Stuffed Mushrooms


These are hands-down the best stuffed mushrooms ever, and once you make them for family and friends they'll be requesting them for every event!  It's really easy to do most of the prep the day before, in fact you'll achieve the best results if you do.


Ingredients:

1 1/2 pounds medium-size fresh mushrooms (all approximately the same size)
6 slices bacon
1/2 cup minced bell pepper
1/2 cup minced onion
6 ounces cream cheese
2 tablespoons Worcestershire sauce
salt and freshly ground black pepper to taste
3/4 cup bread crumbs (homemade or store-bought bread crumbs or Panko crumbs)
2 tablespoons butter
2 tablespoons chopped fresh parsley


The Day Before Serving Day:

Put the bacon in the freezer to firm up.  It's easier to dice that way.  Remove the cream cheese from the fridge to soften.

Clean the mushrooms and let them dry well on paper towels.  Trim off the very ends of the stems (throw the trimmings in your veggie freezer bag for veggie broth later) and separate the stems carefully from the caps.  Line a gallon-size ziplock bag with a paper towel.  Gently lay the mushroom caps on the paper towel in the ziplock in a single layer.  Use more than one ziplock bag if necessary.  Seal the bag and put the mushrooms in the fridge.

Finely dice the mushroom stems.

Remove the bacon from the freezer.  Use a very sharp knife to dice the bacon.

Cook the diced bacon, minced bell pepper, and minced onion in a skillet over medium heat until the bacon is partly cooked but not crisp and the bell pepper and onion are crisp-tender.  Pour into a strainer and drain off grease and liquid.  Transfer bacon mixture to a storage bowl (with a lid), add diced mushroom stems, softened cream cheese, Worcestershire sauce, and salt and pepper to taste.  Mix well while still warm.  It's easiest to mix with a fork.  Put the lid on the storage bowl and refrigerate the filling.


Serving Day:

Preheat oven to 300 degrees.

Remove mushrooms and filling from fridge.  Arrange mushroom caps in a single layer on an oven-safe platter (not your final serving platter).  Fill mushroom caps with the filling.  The easiest way to fill them neatly and evenly is to use a cookie scoop.

Put the platter of filled mushrooms in the oven for approximately 30 minutes, checking them every 10 minutes.  You'll be able to see and smell when it's time to remove the mushrooms from the oven.  Their texture will look different, they'll release some moisture, and they'll start to smell like, well, mushrooms.

Remove from oven and set aside to cool.

Increase oven temperature to 375 degrees.

Melt the butter.  Stir the chopped parsley into the bread crumbs.  Add the melted butter and mix well using two forks.

When the mushrooms are cool enough to handle, gently press a small palmful of the bread crumbs to the top of each mushroom, covering the filling with a mound of crumbs.  Place the mushrooms on an oven-safe serving platter.  Return to the oven and bake just until bread crumb topping is golden brown and crispy, about 5 to 10 minutes.  Keep a close eye on them; the difference between golden brown and shrieking smoke alarm is about 2 seconds!

Note:  If you want to prepare the mushrooms at home and serve them somewhere else, after putting the bread crumbs on the mushrooms, wrap the platter tightly with plastic wrap.  At the serving location, remove plastic wrap and heat mushrooms at 350 degrees until the mushrooms are hot and the crumbs are golden brown and crispy, about 20 to 30 minutes.  Again, keep a close eye on them.

And One More Note:  We always intentionally increase the measurements of the filling ingredients so that we have extra filling left over.  The extra filling is decadently good rolled up in an omelet.

Monday, September 20, 2010

Public Service Announcement

This has no relation whatsoever to anything I regularly blog about, but I want to warn you about something that can pose a danger in your home.  The furniture in the kids' bedroom here is constructed from unpainted wood. When it was purchased about a zillion years ago, I was instructed to apply boiled linseed oil to it from time to time to protect it and keep it looking nice. I've done that a couple of times. On Sunday, my stepdaughter and I used old cotton diaper cloths to apply linseed oil to the furniture in the bedroom. I left the linseed oil-soaked rags on top of the dryer to be laundered later.

After that, we all left home, had a meal at a restaurant, visited the Bass Pro Outdoor World (very cool place) for a while, then we dropped off the girls at their mom's house and returned home. We had been home quite a while when I started smelling very strong fumes of linseed oil, enough to make my eyes burn (which was really strange because its smell when it's applied to the wood furniture is totally inoffensive, it doesn't even necessitate any special ventilation during the application). After searching for the source of the odor, I went to the laundry room and found that the linseed oil-soaked cotton rags were very hot, fumey, sort of scorched-looking, and even smoking a little. I took them outside and put them on the concrete sidewalk, where they cooled off.

I Googled "linseed oil chemical reaction," and found this article about the dangers posed by linseed oil   This stuff if left on a rag can spontaneously combust! We're really lucky that we were back home before it became a problem. I've used the linseed oil on the furniture before, albeit a long time ago, and didn't have any problem, so I didn't even glance at the label this time. The label does warn about this danger. Lesson learned: If you use boiled linseed oil, dispose of your rags in a metal can filled with water, and read the labeling on any product you're about to use.

Friday, September 17, 2010

Tips and Tricks and Helpful Hints

When you use cabbage in a recipe, whether raw or cooked, salt it first for the best flavor and texture.  I like to use the salad spinner for this process.  As you slice, chop, or shred your cabbage, put a layer in the salad spinner and sprinkle with a large pinch of salt.  Continue layering cabbage and salt.  Mix the cabbage and salt with your hands or by tossing/shaking it in the salad spinner.  Let it sit for 30-60 minutes.  You'll notice liquid accumulating on the bottom of the salad spinner bowl (quite a bit with "round head" cabbage, a small amount with Napa cabbage).  That's the water being drawn out of the cabbage by the salt.  Add cold water to the salad spinner to cover the cabbage by an inch or two and swish the cabbage around.  Let that stand for about 15 minutes.  Drain and spin cabbage.  The result is crisp, flavorful cabbage that won't "weep" liquid into your recipe.

Thursday, September 9, 2010

Onion and Mushroom Soup


If you have a mushroom addiction like I do, this is a great way to use up the leftover 3 or 4 or 10 varieties of mushrooms you have in your fridge before they "turn," and you can also finish up those last couple of onions and shallots you have in the basket.  Use what you have on hand and season to your taste.  This is a be-frugal-and-use-your-leftovers recipe, so no specific measurements, just use what you have and season to taste.

Slice onions and/or shallots.  Put them in an oven-safe dish that you've sprayed lightly with olive oil with your Misto sprayer or rubbed lightly with olive oil.  Sprinkle lightly with salt and very lightly with sugar.  Roast uncovered in a 350 degree oven for a long, long time, checking and stirring every 30 minutes, until onions are beginning to caramelize.  Let them get slightly brown, but don't let them burn.

Slice whatever mushrooms you have on hand, the more varieties the better.  Saute tem in a couple tablespoons of olive oil and butter, sprinkled with salt and freshly ground pepper.  Add a couple of garlic cloves pressed through a garlic press.  When mushrooms start looking cooked, add a big splash of sherry and cook until liquid is reduced.

In a stewpot or large saucepan, simmer homemade beef, chicken, or veggie broth if available (or bouillon or canned or box broth if you don't have homemade), water, pinot grigio wine, a little soy sauce, freshly ground pepper, a splash of sherry, granulated toasted onion if you have it (I love Penzey's http://www.penzeys.com/cgi-bin/penzeys/results.html), and a sprinkle of cayenne pepper powder.

Add roasted onions and sauteed mushrooms to the broth and simmer a while to combine flavors.


To serve, if you follow a low carb diet, ladle soup into ramekins and top with shredded or thinly sliced gruyere, emmental, or swiss cheese.  Broil in oven for a few minutes until cheese is melted and lightly browned.  If you don't worry about carbs, ladle soup into ramekins, top with a slice of toasted baguette and shredded or thinly sliced gruyere, emmental, or swiss cheese.  Broil in oven for a few minutes until cheese is melted and lightly browned.

Enjoy!

Southwest Spicy Compound Butter


2 sticks salted butter, softened
6 cloves garlic, pressed through a garlic press
zest of 2 small limes
2 tablespoons chipotle pepper sauce
1 bunch of cilantro, finely chopped

Mix all ingredients well.  Serve on top of steak, steamed veggies, etc.  Roll leftover compound butter into a log shape in waxed paper and freeze for later use.

Are You Ready For Some Football?!

In the category of other pleasures that make life splendid ... the NFL 2010 season kicked off tonight, and what a great opening game!  Saints 14 - Vikings 9.  I love sports and I've come to love football much more since marrying my honey.  It's so much better when you can watch the games with someone who is as interested as you are and especially with someone who is much more knowledgeable about the game and can explain the intricacies of the game clearly.  I'd have been happy no matter who won the game tonight.  How could I not pull for the Vikings with Brett Favre, the QB who is almost as old as I am?  The fitness and athleticism of this guy amazes me.  And who wouldn't love the great story of undrafted Drew Brees becoming the QB for the Saints and leading them to a Super Bowl victory last year, giving a still-reeling-from-Katrina New Orleans a great reason to celebrate?

I'm not just excited for football, but also because football season marks the beginning of fall.  I can't wait for open windows weather, the State Fair of Texas, Halloween, and Thanksgiving.  When you live in a place where summer temps routinely climb above 100 degrees, fall is a welcome respite.  I know this is also a very special time of year for those who love college football, which I really am trying to care more about, honestly ...

So the sports fan in me is ecstatic now as my FC Dallas soccer team is on a record undefeated streak, my Texas Rangers baseball team is handily leading its division, and my Dallas Cowboys football team looks so very promising this season.  Can't wait for the Cowboys' season opener this Sunday.  Go 'boys!

I hope everyone is enjoying this glorious fall season and I wish the best of luck to your favorite teams!

Thursday, August 19, 2010

Roulade Meatloaf

Start with ground beef mixed with some Montreal steak seasoning and dehydrated soup vegetables.  Press the ground beef out flat in a sheet pan, like pastry.  Coat with a layer of fromage fort or any spreadable cheese.  Add chopped mushrooms (or leftover sauteed mushrooms), sundried tomatoes, chopped garlic, chopped spinach, chopped basil, really any flavorful ingredients you can think of.  Roll up into a loaf.  Place on a baking rack over a sheet pan.  Bake at 400 degrees for 15-30 minutes to brown and crisp the exterior, then reduce to 350 degrees until done (use a meat thermometer to check the internal temperature from time to time for doneness).

Here's the meatloaf before baking.  Unfortunately I forgot to take a pic of the finished meatloaf.

Fromage Fort, A Beautiful Way To Turn Cheese Scraps Into Gourmet Cheese Spread


If you love cheese, and if you have my weakness for cheese, you probably end up with plenty of "nubs" of cheese in your fridge.  Fromage Fort is a beautiful way to use up your last bits of leftover cheese.

Just gather up your leftover little bits of cheese and dice them up.  Throw them in the food processor with a clove of garlic and your favorite combination of cream cheese and/or butter and/or white wine.  Process until smooth.  You'll have a fabulous gourmet cheese spread made from leftovers.  How cool is that?

Vietnamese Spring Rolls With Nuoc Cham Dipping Sauce


I first experienced Vietnamese food in 1987.  My boss' boss at the time had come to Dallas from Vietnam.  She took our group to lunch at a Vietnamese restaurant in East Dallas, so we had the benefit of a Vietnamese native to direct our choices.  It was love at first bite for me.  Vietnamese food is so fresh and healthy and such a beautiful blend of all the flavors.  Vietnamese food has been among my favorites ever since.  One of my very favorite Vietnamese foods is the spring rolls with nuoc cham sauce.  Sometimes Vietnamese spring rolls are served with peanut sauce; however, I haven't found nor been able to develop a recipe for peanut sauce that even approaches the perfection of nuoc cham.  I'll continue researching Vietnamese peanut sauces, but in the meantime here are some simple recipes to satisfy your Vietnamese cravings:


Vietnamese Spring Rolls


Boiled and peeled shrimp and/or marinated cooked pork (about 12 shrimp or the equivalent weight in pork)
2 ounces dried rice stick noodles or rice vermicelli, cooked according to package directions
8 round rice paper spring roll wrappers (readily available at Asian markets)
1/2 cup mung bean sprouts, rinsed
16 Thai basil leaves
8 cilantro sprigs
1 small cucumber, peeled, seeded, and cut into 1/4-by-1/4-by-2-inch sticks
2 large scallions, trimmed, halved, and sliced into 3-inch lengths


Cut the shrimp in half  lengthwise or julienne the pork.

Clear a work surface and place all filling ingredients in separate containers in the following order around the work surface:  Rice paper wrappers, shrimp and/or pork, rice noodles, bean sprouts, basil, cilantro, cucumber, scallions.


Place a damp layer of paper towels on work surface.


Pour hot water into a wide shallow dish or large dinner plate.  Submerge a wrapper until it is slightly soft and pliable.  Remove from water and place on the work surface.


Working quickly, lay 3 shrimp halves or some diced pork in a row, just above the center of the wrapper.  Layer a scant 1/4 cup of the rice noodles over the shrimp, followed by a few bean sprouts, 2 basil leaves, and 1 sprig of cilantro.  Place 3 to 4 cucumber sticks and 3 to 4 scallion pieces on either side of the noodle pile.  Fold the bottom half of the rice paper wrapper over the filling.  Holding it firmly in place, fold the sides of the wrapper in.  Then, pressing firmly down to hold the folds in place, roll the entire pile up to close the top.  (Think burrito style.)  Turn each roll so that the rice paper seam faces downward.  Serve with nuoc cham dipping sauce.


Vietnamese Nuoc Cham Dipping Sauce


5 tablespoons sugar
3 tablespoons water
1/3 cup fish sauce (nuoc nam)
1/2 cup lime or lemon juice (about 3 limes or 2 lemons)
1 large clove garlic, crushed, peeled, and sliced or minced
1 or more bird's eye or Thai chilies, seeded and sliced or minced
Sprinkling of finely shredded carrot


Whisk together the sugar, water, fish sauce, and lime or lemon juice in a bowl until the sugar is completely dissolved. Add the garlic and chili and let stand for 30 minutes before serving.  Decorate with shredded carrot.

Super Easy Recipe For Fantastic Homemade Beef Stock/Broth


I won't dare get into the ongoing debate about stock vs. broth.  This recipe uses wonderful beef bones as well as flavorful meat, so I guess it could be either a stock or a broth.  It's based on a recipe that Alton Brown prepared on his Good Eats program.  He used a pressure cooker to speed up the cooking process.  We don't currently own a pressure cooker and we're not really concerned about making speedy recipes, so we used the oven to brown the meaty bones and the slow cooker (Crock Pot) to simmer the broth.  There aren't any exact measurements for this recipe, just use whatever amounts your slow cooker can hold.  You don't have to do a lot of cleaning/prepping of the veggies because you're going to strain everything later.

Beef shank, oxtail, and/or beef bones
Carrots, rinsed and rough chopped
Celery, rinsed and rough chopped
Onions, rinsed and cut in quarters
Garlic heads, cut in half horizontally
Homemade veggie broth if you have it
Any leftover herbs you have lying around
Salt
Pepper
Sherry

Preheat the oven to 400 degrees.  Put the beef/beef bones on a baking rack, roasting pan, or grill pan, anything that will allow the heat to circulate well and allow some of the fat to drain off as it cooks.  Roast for an hour to an hour and a half, checking regularly.  You want the meat and bones to become very well caramelized to develop the flavor (the Maillard reaction), but you obviously don't want them to burn.

Remove beef and bones from oven.  Start heating your slow cooker at high heat.  Add the beef and bones, carrots, celery, onions, garlic, homemade veggie broth if you have it, several big pinches of salt, and lots of freshly ground pepper.  Cover with water within an inch or so of the top of the slow cooker.

Cook on high heat at least 12 hours.  The longer the better.  Stir the mixture from time to time.  If you notice any foam gathering on the surface skim it off.  If you notice marrow in any of the bones, scrape it out with a spoon into the pot; it's a very flavorful addition to the stock.  After 12 hours or so add any leftover herbs you have and continue cooking.

When the broth is cooked to your liking, turn off the slow cooker and let the mixture cool.  When cool enough to handle, place a collander over a large stewpot.  Drain the broth into the stewpot, removing the solids.  Cook the broth on the stovetop over medium heat until slightly reduced.  Taste and add more salt and pepper if needed.  Add a healthy splash of sherry, also to taste.  Sherry vinegar will also work if you don't want the alcohol.  When reduced to your liking, place a mesh strainer over a large glass measuring cup or a mixing bowl, cover the strainer with a double layer of cheesecloth, and pour the broth through to strain it well.  Refrigerate the strained broth.  The next day, remove the fat layer that will have congealed on top of the broth.

The broth can be used immediately or can be frozen for later use.  A really easy way to freeze broth is to pour it into a silicone muffin pan, freeze, then pop out the broth "icecubes" into a labeled zip-lock bag for future use.

This broth will be very flavorful and meaty-tasting.  Although it's not quite demi-glace it has a lot of collagen in it.  As it's beginning to freeze you'll see that it has the consistency of Jell-O.  It's a great base for soups and sauces.  It is amazing when heated, reduced slightly, and served over creamed potatoes.  Yeah, just speaking from experience and daydreaming for a moment there :)

This stuff is beautiful.  It takes a lot of of time to cook, but not a lot of hands-on time and it isn't a difficult recipe to execute.  I hope you'll try it.  It will give a professional touch to your soups and sauces.

Tuesday, August 17, 2010

Cooking With Cuqui, Installment 1


I'm so excited to introduce the first regular feature on this blog, Cooking With Cuqui.  My mother-in-law, Cuqui (pronounced Cookie), is originally from Puerto Rico, and has also lived in New York City, Carracas, Mexico City, and now in the Dallas-Fort Worth Metroplex.  I'm anxious to learn to cook her native Puerto Rican food, which is my precious husband's childhood food, as well as some of the recipes she learned in the other places that she lived. 

I'm so fortunate to have grown up in a family of great cooks.  I was helping out in the kitchen from the time that I was old enough to stir a pot.  With my mother and my grandparents, I learned to cook healthy, nutritious meals.  My paternal grandparents were East Texas farming folks and my Papa (my paternal grandfather) also was a decorated soldier.  In the time I spent with my paternal grandparents, I experienced a lot of good, old-fashioned southern "soul" food, the kind of food that is inexpensive to cook but so incredibly tasty.  And when I say old-fashioned I'm not kidding.  My Nanny Sue (my paternal grandmother) would have us prepare the food to feed the "menfolk" first, then the women and children were fed.  That's just the way she grew up back in the day in a family of southern sharecroppers.

My maternal grandparents were well-educated city folk who decided to move to the country in search of a healthier lifestyle.  They became gardeners and were interested in vitamins and nutrients long before it was trendy to care about such things.  I spent a lot of fun times with them in their garden, harvesting fresh fruits and veggies.  One of my biggest treats as a child was the weeks I got to spend with my grandparents in the summer, working in the garden, harvesting produce, and canning tomatoes.

At home we ate really well and really healthy.  My mom is a great, nutritious, frugal cook.  She's a very talented artist and she always taught us the concept that you eat with your eyes first.  We learned that the food has to be pretty on the plate.  You simply cannot serve a plate full of beige foods.

All this is to say that cooking is a family heritage that is important to preserve.  A great part of the reason I began this blog is to collect all the recipes that my precious hubby, Gordon, and I cook, including our families' recipes, in a convenient way so our kids can access them now and when we're gone.  My husband and I want to be sure that family recipes live on; therefore, it's very important to us to preserve the Puerto Rican cooking heritage of his family.

And now, without further ado, the first installment of Cooking With Cuqui:  Bistec en Cebollado, Puerto Rican-Style Habichuelas, y Arroz Blanco (Steak with Onions, Puerto-Rican Beans, and White Rice)

One of the many reasons I love this type of cooking is that it's done very much by eye and by taste, my favorite way to cook.  Please adjust measurements to your taste.

Bistec en Cebollado

3 lbs. cube steak
2 white onions, halved and sliced thin
1 head of garlic, separated into cloves and peeled
1 tablespoon sea salt (or to taste)
Couple pinches coarse ground black pepper
1/2 cup olive oil
1/4 cup apple cider vinegar
1 lime
Olive oil for the frying pan
1 ripe avocado
Drizzle of olive oil for avocado
Sprinkle of sea salt for avocado

In a pilon (mortar and pestle) grind the garlic cloves with the sea salt, then add the black pepper, olive oil, vinegar, and juice from 1 lime.  Rub this mixture gently into the cube steak and set aside to marinate for 1 to 2 hours.


Heat frying pan over medium heat and add enough olive oil to generously coat the bottom, a couple of tablespoons.  When olive oil is warm, add the onion and cook, stirring from time to time, until the onion begins to caramelize, around 20 minutes.


Remove onions to a bowl.  Increase temperature of frying pan to medium-high or high, add a little more olive oil, and add some of the cube steaks.  (Cook in batches; don't overcrowd the pan.)  Cook 3-5 minutes, then turn steaks over.  Steak will release easily from the pan when ready to turn.  Cook about 3 minutes on the other side.  You want these steaks to be just cooked through but not overdone.

When all steaks are cooked, combine them with the onions in the frying pan.  Serve warm with beans, white rice, and slices of avocado dressed with olive oil and sea salt.

Puerto Rican-Style Habichuelas (Beans)

Olive oil
1/3 cup diced ham
1/3 cup diced Spanish-style chorizo (such as Goya)
1 finely diced white onion
1 finely diced bell pepper
1 diced tomato
3 or 4 cloves garlic
1 teaspoon salt
pinch coarsely ground black pepper
1/3 cup tomato sauce
1 large can of Goya red kidney beans, drained and rinsed
1/3 cup sliced green olives
2 tablespoons capers
1 can of chicken broth (use the bean can to measure)
1 packet Goya sazon
1 or 2 tablespoons apple cider vinegar
1 small green plaintain, shredded on a cheese grater

Heat Dutch oven over medium to medium-high heat.  Add olive oil to coat generously.  Add diced ham and chorizo and cook for several minutes.  Add onion and bell pepper and cooked until softened.  Add diced tomato.  Mash garlic with salt in a pilon; add black pepper and enough olive oil to pilon to form a paste.  Scrape garlic paste into Dutch oven, adding a little water to pilon if necessary to get all the garlic out.  Cook for several minutes.


Add beans.  Add tomato sauce, olives, and capers and cook for several minutes.  Add chicken broth, sazon, and vinegar.  Simmer over medium heat until flavors are well combined.  Bring to a boil and then add shredded plaintain, which adds flavor and is also a great thickening agent.  Cook at a low boil for several minutes, then you're ready to serve.

Cuqui's Puerto Rican White Rice

White rice sounds like the easiest thing in the world to cook; however, there's something special about Cuqui's white rice,  It's like a siren song to the family, beckoning everyone to visit whenever she makes it.

3 cups short-grain white rice
3 tablespoons olive oil
3 3/4 cups boiling water
3 teaspoons salt

Heat olive oil over medium heat (preferably in a Latin style caldero).  Add rice.  Cook and stir for several minutes.  Let the rice cook enough that it develops a little toasty flavor.  Add boiling water.  Simmer rice until you see "tunnels"  through the rice and until the rice stops making a lot of sizzling/crackling sounds.  Sorry that this step is a little hard  to describe. 


Using a large spoon or spatula, turn over all the rice so that all the rice from the bottom of the pan is now on the top.  Reduce temperature to lowest setting, cover, and cook for 30 minutes without peeking or touching.   Then stir/fluff with a fork.

Tuesday, July 20, 2010

Recipe For Homemade Buttermilk Blue Cheese Salad Dressing


I've read in more than one blog, "Never buy salad dressing.  Make your own."  I agree.  The benefits of making your own salad dressing are numerous.  It's easy to make, you can adjust the ingredients to your taste, and you know what goes into it.  It's often, though not always, cheaper to make your own dressing.   When it's more expensive it's only because you're using better quality ingredients than the bottled stuff.  This is the recipe I made after looking at several different recipes to decide on the combination of ingredients I wanted to use.

Buttermilk Blue Cheese Salad Dressing

2 1/2 ounces good quality blue cheese
3 tablespoons buttermilk
3 tablespoons sour cream
2 tablespoons mayonnaise
2 teaspoons champagne vinegar (or white wine vinegar or tarragon vinegar)
1/4 teaspoon sugar
1/3 teaspoon granulated toasted onion powder (available from Penzey's -- you can substitute garlic powder)
Tabasco sauce to taste (a couple shakes)
salt and freshly ground black pepper


In a small bowl, mix the blue cheese and buttermilk together with a fork until the mixture is semi-smooth.  Stir in sour cream, mayonnaise, vinegar, sugar, onion powder, and Tabasco until well blended.  Add salt and pepper to taste.

Sunday, July 4, 2010

Cute Little Party Sliders With Puff Pastry Buns and Homemade Ketchup


Sliders

2 1/2 pounds ground beef
5 slices bacon, finely chopped (bacon is easy to chop if you pop it into the freezer for a while first)
1/2 cup roasted garlic
1/4 cup sweated chopped onions
1/2 cup grated parmesan cheese
5 anchovy filets, mashed with a fork before mixing with ground beef
1/2 cup panko crumbs
1 egg
2 tablespoons dijon mustard
splash of worcestershire sauce
splash of tabasco sauce

Mix everything together with the tools that God gave you. Don't bother trying to mix with a spoon; it's a lost cause; get your hands in there!

Put muffin liners in a muffin tin. Press out part of the slider mixture, pastry dough style, onto a clean counter or a cutting board that can be sterilized. Use a cookie/biscuit cutter to cut equal/even sliders. Make sure that all sliders are the same thickness by judging according to the height of the cutter you're using. Place each slider into a muffin cup. As you fill the muffin cups, place new liners on top and continue filling with sliders. You can freeze any extra stacks of sliders to cook later.


To cook sliders:  Heat a skillet to medium-hot.  Sprinkle well with freshly ground black pepper.  You don't need to add any extra salt to this recipe.  Cook each slider for several minutes on each side.  Serve on puff pastry "buns" with homemade ketchup and any other condiments you like.


Puff Pastry "Buns"

1 package of puff pastry

Preheat oven to 400 degrees.

For the "buns," roll out a sheet of the puff pastry to a roughly 13" by 15" square. Use a cookie/biscuit cutter one size larger than you used for the sliders to cut round "buns" from the puff pastry.  Place on a cookie sheet and cook until puffy and golden.  Repeat with the second sheet of puff pastry.

When I prepared this recipe the first time I made some faulty assumptions: I used the same size biscuit cutter for the sliders and the buns, thinking that the sliders would shrink more than they actually did and thinking the puff pastry "buns" would shrink less than they actually did. I recommend using a biscuit cutter one size larger for cutting the puff pastry than for cutting the sliders.

When the puff pastry "buns" cool, you can easily slice them in half to form top and bottom buns for your sliders.


Homemade Ketchup

 (This amazing recipe is from Jamie Oliver on the Food Network.  It takes a little time to make, but it's not difficult and it's absolutely worth making as it adds that "something special" to your sliders.)

Bizarrely enough for a chef, I really do take my hat off to Heinz, who have become the global brand of quality in the ketchup world. It's such an everyday cupboard product that you've probably never thought to make your own. But if you're growing tomatoes in the garden, or you catch sight of some really beautiful ones at the market in summer, just think how much of a treat it would be to offer your family or guests homemade ketchup. It's great fun to make. And you can make different colors of ketchup using just yellow, orange or green tomatoes - simply exchange the cherry and canned tomatoes for the same amount of your chosen colored ones.

Ingredients

1 large red onion, peeled and roughly chopped
1/2 bulb fennel, trimmed and roughly chopped
1 stick celery, trimmed and roughly chopped
Olive oil
Thumb-sized piece fresh ginger, peeled and roughly chopped
2 cloves garlic, peeled and sliced
1/2 a fresh red chili, deseeded and finely chopped
Bunch fresh basil, leaves picked, stalks chopped
1 tablespoon coriander seeds
2 cloves
Sea salt
1 teaspoon freshly ground black pepper
1 pound amazing cherry or plum tomatoes, halved plus 1 pound canned plum tomatoes, chopped or 2 pounds yellow, orange or green tomatoes, chopped
3/4 cup plus 2 tablespoons red wine vinegar
1/3 cup soft brown sugar

Place all the vegetables in a large heavy-bottomed saucepan with a big splash of olive oil and the ginger, garlic, chili, basil stalks, coriander seeds and cloves. Season with the pepper and a good pinch of salt.

Cook gently over a low heat for 10 to 15 minutes until softened, stirring every so often. Add all the tomatoes and 1 1/2 cups of cold water. Bring to the boil and simmer gently until the sauce reduces by half.

Add the basil leaves, then whiz the sauce in a food processor or with a hand blender and push it through a sieve twice, to make it smooth and shiny. Put the sauce into a clean pan and add the vinegar and the sugar. Place the sauce on the heat and simmer until it reduces and thickens to the consistency of tomato ketchup. At this point, correct the seasoning to taste.

Happy Birthday USA!

Happy birthday to the greatest nation on the face of the planet.  We're so blessed to live here.  Fireworks, pool parties, and burgers on the grill, that's pretty good; living in a democratic society, free of governmental or religious oppression, now that's something to celebrate!  Happy 4th of July, everyone.

Wednesday, June 30, 2010

Smoked Salmon Dip


This is a great way to finish up any leftover home-smoked salmon you have, if you have any left over, that is.  Purchased smoked salmon works too!

Smoked Salmon Dip

2 cups shredded smoked salmon
1/4 cup finely minced red onion or shallot
Juice of 2 lemons
8 ounces cream cheese, softened
1/2 cup creme fraiche or sour cream
Tabasco sauce to taste

Mix all ingredients until well combined.  Smoked salmon is very salty, so no need to add extra salt. 

Serve with sliced baguettes, crackers, or veggie sticks.  This dip is even better after it's been refrigerated for a couple of hours to let the flavors meld. 

In the photo at the top of this post, the smoked salmon dip is served on flatbread crackers from Central Market, and sprinkled with a little Green Goddess dressing mix from Penzey's.

Smoked Salmon Recipe


Don't you love Alton Brown's show Good Eats on the Food Network?  He reaches out to my inner food geek with his brilliant analysis and explanations of the chemistry of food.  We recently tried his recipe for smoked salmon, and it's terrific.  It's sort of like a cross between the smoked salmon you get in the supermarket, which isn't truly smoked, but is actually cured, and warm smoked salmon that you make at home in your backyard smoker.

This should be made with salmon fillets with the skins on.  We purchased some beautiful salmon to prepare this recipe and didn't realize until we unpackaged it at home that it didn't have the skin.  I recommend using salmon with skin, or if you use skinless salmon reduce the amount of salt/sugar/peppercorn rub significantly because skinless salmon absorbs so much more of the rub.

So from Alton Brown's Good Eats on the Food Network, here's the recipe:

Smoked Salmon

Ingredients
1 cup kosher salt
1/2 cup sugar
1/2 cup dark brown sugar
1 tablespoon crushed black peppercorns
2 large salmon fillets or sides, pin bones removed

Directions
In a bowl, mix together salt, sugar, brown sugar, and peppercorns.  Spread extra-wide aluminum foil a little longer than the length of the fish and top with an equally long layer of plastic wrap.  Sprinkle 1/3 of the rub onto the plastic.  Lay 1 side of the fish skin down onto the rub.  Sprinkle 1/3 of the rub onto the flesh of the salmon.  Place second side of salmon, flesh down, onto the first side.  Use the remaining rub to cover the skin on the top piece.  Fold plastic over to cover, then close edges of foil together and crimp tightly around the fish.


Place wrapped fish onto a plank or sheet pan and top with another plank or pan.  Weight with a heavy phone book or a brick or two and refrigerate for 12 hours.  Flip the fish over and refrigerate another 12 hours.  Some juice will leak out during the process, so make sure there's a place for the runoff to gather.

Unwrap fish and rinse off the cure with cold water.  Pat salmon with paper towels, then place in a cool, dry place (not thre refrigerator) until the surface of the fish is dry and matte-like, 1 to 3 hours depending on humidity.  A fan may be used to speed the process.


Smoke fish over smoldering hardwood chips or sawdust, keeping the temperature inside the smoker between 150 degrees F and 160 degrees F until the thickest part of the fish registers 150 degrees.  Serve immediately or cool to room temperature, wrap tightly, and refrigerate for up to 3 days.

Serve with the traditional salmon accoutrements:  creme fraiche or sour cream, capers, diced hardboiled egg, diced red onion, fresh dill, thin lemon slices.

If you have any left over after a day or two, make smoked salmon dip.  That recipe is next.

Monday, June 28, 2010

Mushroom, Leek, and Goat Cheese Phyllo Triangles


I'm experimenting with lots of little yummies lately.  I've always been partial to appetizers, tiny flavorful cuties.  Along the same lines, I like the "small bites" concept and hope to experiment a bit with that, and I also like the "deconstructed" concept, reducing familiar foods to their individual components and showcasing the ingredients.

Sometimes I get inspired by the idea of a food combination that I think will be really tasty and I'll Google search the ingredients I'm interested in until I find some recipes that seem promising, then combine components of the recipes, hoping to create the masterpiece that I envision.  Of course, sometimes my idea falls flat; however, sometimes my inspiration produces exactly what I hoped to achieve and it's scrumptious.

I wanted to create an unctious, crispy appetizer featuring assorted mushrooms, leeks, and goat cheese wrapped in crispy phyllo dough to serve at a recent birthday celebration.  I combined ideas from a couple of recipes and here's what I came up with.  Everyone seemed to enjoy it and I hope you will too ...

Mushroom, Leek, and Goat Cheese Phyllo Triangles

2 pounds assorted mushrooms (I used creminini, shiitake, and oyster)
Oive oil to coat pan
2 leeks
2 teaspoons finely chopped fresh thyme
Healthy splash of sherry
8 ounces goat cheese
Salt and freshly ground pepper
Phyllo dough (number of sheets needed will vary according to volume of filling, but phyllo is typically packed in two bags per box and you'll probably not quite use up one of the bags)
1 stick butter

Clean up mushrooms.  I know some people say to just brush them, but I prefer to gently rinse them.  It's up to you.  With a paring knife trim away the very ends of the mushroom stems.  The exception is the shiitakes.  Their stems are virtually inedible, so completely detach the stems from the shiitake caps.  (Remember to put your mushroom trimmings and all your other veggie trimmings into a ziplock bag and pop it into the freezer so that you can simmer up some veggie broth later.  It's liquid gold, I tell you.)  Roughly chop all the mushrooms.

Prepare the leeks.  Look at your leeks and find the point where the leaves start "branching out."  Cut just below that branch-off spot and toss the upper, darker-colored leafy leek parts into your veggie freezer bag.  Trim away the root ends from the leeks.  Cut the leeks into quarters lengthwise.  Put them in a very large bowl of cold water and separate them into individual leaves.  Rinse very well, draining the water and refilling the bowl as necessary.  Leeks can be very sandy and you need to be sure to clean out all the grit.  Clean very, very well.


After draining the leaks, slice them very thin.  Coat a large nonstick saute pan with olive oil.  Heat to medium.  Add leeks to pan, sprinkle with a couple healthy pinches of kosher salt (to help draw the moisture out of the leeks), and sweat until softened but not browned.  Remove leeks to a sieve or collander placed over a mixing bowl.  Place a bowl over the leeks in the sieve or collander and weight it down with a heavy can from your pantry to press the extra moisture out of the leeks.

While leeks are draining, again coat your saute pan with olive oil.  Add chopped mushrooms to pan and sprinkle with a couple healthy pinches of kosher salt to help draw the moisture out of the mushrooms.  Saute until the mushrooms are cooked through.  Add a couple healthy splashes of sherry  and several grinds of black pepper and continue cooking until all the sherry is absorbed.  Remove from heat and add the fresh thyme.


Cool the cooked mushrooms a little, then transfer to a food processor and pulse to a coarse puree.  Scrape the puree into a medium mixing bowl, add leeks, and add goat cheese.  Mix well.  Taste and add more salt and pepper if necessary.

Preheat the oven to 400 degrees.   Melt the stick of butter in the microwave or in a small pan over very low heat.  Don't let the butter get hot.  Prepare a couple of baking sheets or cookie sheets by wrapping them with aluminum foil for easy cleanup later.

Lay one sheet of the phyllo on a clean work surface.  (I use my kitchen counter.  I clean it well with antibacterial wipes, then clean away any soap residue with a damp paper towel, then dry with a dry paper towel.)  Keep the rest of the phyllo covered with damp paper towels.  Using a silicone brush or a pastry brush, brush the phyllo sheet with melted butter.  Cut it lengthwise into 3 long, even strips.  Place 1 level tablespoon of the filling in a corner of one of the strips, about 1/2 inch from the top.  Fold the corner down to form a triangle.  Continue folding the triangle onto itself, across and down, until you have a neat phyllo triangle.

Two tips:  Using a "cookie scoop" makes measuring a tablespoon of filling easier.  If you've ever folded an American flag Boy Scout style, that's the technique you want to use to fold the phyllo into triangles.  It's also the same technique you used in junior high when you made little paper triangle footballs that you thumped over the student in front of you in class to "score" a touchdown.

Place the triangles on the baking sheet or cookie sheet.  Brush the top of the triangles with some of the melted butter and bake for about 20 minutes, or until browned and crisp.  Remove from oven and let cool slightly before serving.

This recipe is pretty simple, but produces an elegant little pastry.  I hope you'll give it a try.

Friday, June 18, 2010

Baked Stuffed Shrimp With Remoulade Style Sauce

These shrimp make a very tasty tapas-style appetizer.

Technique:  when you devein the shrimp, then cut all the way through the middle of the shrimp, so that you leave a hole in the middle, then you can lay the shrimp out flat on a baking dish with the body of the shrimp lying nice and flat and the tail facing up for a pretty presentation.  You can then "stuff" the body of the shrimp without the stuffing falling out of the shrimp.


Baked Stuffed Shrimp


25 fairly large shrimp, heads removed and shells removed except for last segment and tail, deveined and cut as described above
1/4 cup red bell pepper, very small dice
1 Korean pepper, very small dice (if you don't have Korean pepper available, just increase the amount of red bell pepper a bit)
1/2 cup shallots, very small dice
2 tablespoons garlic, minced or pressed through a garlic press
zest of 1 lemon (Meyer lemon if available) (use a microplane)
1 tablespoon chopped fresh parsley
2 tablespoons chopped fresh dill
1 teaspoon paprika (if you use only red bell pepper, then use Hungary half-sharp paprika; if you use a combination of red bell pepper and Korean pepper, then use regular paprika)
1 teaspoon salt
1/2 teaspoon freshly ground black pepper
3 tablespoons melted butter
1 cup panko crumbs

Mix all ingredients with a fork.  Place the prepared shrimp on a baking sheet.  Scoop up the filling with a standard teaspoon, press it slightly with your hand into a ball, and place on a shrimp.  Continue until each shrimp is "stuffed."  Make sure each shrimp tail curves up and over the stuffing for a pretty presentation.


Bake at 350 degrees for 20 to 30 minutes, until shrimp are pink and stuffing is golden brown.  Serve with remoulade style sauce.

Remoulade Style Sauce

1 cup mayonnaise
Juice of 1 lemon (Meyer lemon if available)
1/3 cup spicy brown mustard
1 tablespoon garlic, minced or pressed through a garlic press
2 tablespoons shallot, very small dice
2 tablespoons capers, rough chopped
splash of port wine vinegar or red wine vinegar
splash of Tabasco sauce

Mix ingredients well and serve with baked stuffed shrimp or any other seafood.

Sunday, June 6, 2010

I Love This Store!


Are you someone who tries a new food not in spite of the fact that you've never had it before, but because you've never had it before?  Do you buy something at the grocery simply because you don't have a clue what it tastes like so you want to take it home and start Google searching for recipes to use it?  Well, then, ethnic groceries will ignite your foodie flame!  I've always been a pretty adventurous eater, and since marrying my darling hubby I've tried tons of new foods.  He's a great inspiration because he's lived in so many places and is so knowledgeable about the culture of food and he also likes to try new things.  It's really fun to "discover" food finds in restaurants and stores.

I love, love, love shopping in all kinds of ethnic grocery stores.  I love the exotic ingredients they stock, I love the fragrances, I love the product labels in foreign languages, I love the people watching, and I love the prices.  A trip to a really good ethnic market is like a vacation to me.  I'm so blessed to live here smack-dab in the middle of the Dallas-Fort Worth Metroplex where I have easy access to stores catering to cultures from all over the world.

One of my all-time favorite Mexican groceries is the Carnival Food Store located at 3460 Webb Chapel Extension  in Dallas.  Here's a sampling of the "booty" from my last visit there:


Yes, the item at the bottom left of the pic is a bag of the famous and elusive Camellia red kidney beans.  I hate to share my secret source, but I feel it's my duty as a food-lover :)  They not only carry the Camellia red kidney beans, they also carry two or three other varieties of Camellia brand beans.  And yes, I think these beans are deserving of the hype.  They seem to be very fresh and tender.

I'm really fond of Goya brand items.  Their products are consistently good quality and reasonably priced.  Goya olive oil is the everyday olive oil of choice in our kitchen.  We especially enjoy the Goya chorizo, which is the Spanish-style cured type chorizo rather than the Mexican-style fresh type chorizo.  It's so good and so inexpensive.  Carnival is the only place I can always count on finding the Goya chorizo.  Do you think they laugh at me after I leave the check-out line for buying 10-15 packages of chorizo?

I was surprised to find Cento San Marzano tomatoes at Carnival.  Pretty cool.  Not to mention that Carnival and many other ethnic groceries have true butcher counters with cuts of meat you can't find at your local Kroger or Tom Thumb, and they usually have really good pre-marinated meat for the grill:  chicken fajita, beef fajita, ribs.

I enjoy the opportunity to practice my extremely limited, extremely weak Spanish at Carnival or any Mexican market, but I haven't been to a Mexican market in the Metroplex where the employees didn't speak English, so don't be intimidated by any perceived language barrier.

Why I'll Never Be A Great Gardener

For one thing, I let my herbs flower and go to seed.  You're really not supposed to do that because you end up with "leggy" plants instead of nice leafy plants.  But they're so pretty when they flower and it's really cool if you end up with "volunteers," my grandmother's term for plants that self seed from the previous year.


Parsley In Bloom

I also can't stand to remove the really cute critters from my herbs.  The caterpillars that turn into Monarch butterflies love parsley.  How could I possibly begrudge this little cutie-pie a yummy snack?


Monarch Caterpillar Feasting On Flat-Leaf Parsley

It's kinda funny, a few weeks ago there was a group of monarch caterpillars on the curly parsley.  The current caterpillar gang is only eating the flat-leaf parsley.  I guess even caterpillars have their favorite restaurants.

Kid-Friendly Wheat Bread (Kid Tested and Kid Approved)

My almost-11-year-old stepdaughter, Morgan, and I made this recipe last weekend.  We don't have a stand mixer, so we mixed the dough with a spoon until it got too stiff to mix and then kneaded it by hand.  We decided that kneading dough not only makes good bread but it could also be a healthy way to work out frustration!


Look at Morgan bake!  You go, girl!!!


The recipe is from Susan K. at allrecipes.com.  Link:  http://allrecipes.com/Recipe/Kid-Friendly-Wheat-Bread/Detail.aspx


Ingredients


1 1/2 cups warm water (110 degrees F/45 degrees C)
1 tablespoon brown sugar
2 (.25 ounce) envelopes active dry yeast
2 cups all-purpose flour
4 cups whole wheat flour
1/3 cup packed brown sugar
2 teaspoons salt
1/3 cup vegetable oil
1/2 cup milk, room temperature


Directions


  1. Measure the water into a large bowl, or the bowl of a stand mixer and stir in 1 tablespoon of brown sugar. Sprinkle the yeast over the top and set aside until foamy, about 10 minutes.
  2. Add 1 cup of the all-purpose flour and 3 cups of whole wheat flour to the bowl along with the brown sugar, salt, vegetable oil and milk. Mix on low speed to blend ingredients. Continue to mix on medium speed, adding the rest of the flour 1/2 cup at a time, until the dough clings to the hook and cleans the sides of the bowl. You may not need to add all of the flour. Mix on medium speed for about 5 minutes. Oil the bowl and turn the dough to coat. Cover loosely and set aside to rise until doubled, about 1 hour.
  3. Punch down the dough and place on a floured surface. Divide into two equal portions and use a rolling pin to roll each one into a rectangle that is about 16x8 inches. Be sure to press out all of the air bubbles. Roll the rectangles into loaves and pinch the seam together.
  4. Place loaves seam side down into greased 9x5 inch loaf pans. Cut a few slits across the top of each loaf using a sharp serrated knife. Set aside to rise until your finger leaves a dimple when you press into a loaf, 30 to 45 minutes. Preheat the oven to 400 degrees F (200 degrees C).
  5. Bake the loaves for 15 minutes in the preheated oven, then reduce the temperature to 350 degrees F (175 degrees C). Bake for an additional 30 minutes, or until loaves are deep brown. Remove from pans to cool on a wire rack.


Next time we'll be sure to brush off more of the flour so the loaves will be prettier.  Other than that we wouldn't alter a thing about the recipe.  It's yummy!!!