My recipes are meant to be shared and enjoyed. I welcome you to re-post my recipes and text. I ask only that you credit me and include a link to my blog if you post any of my content.

Thursday, January 27, 2011

Plunging Headlong Into Charcuterie ... Homemade, Home-Smoked Bacon


Check out this peppery, smoky, sizzling greatness!
 I love all things salted, cured, and preserved ... and I love pork ... therefore, I love Charcuterie!

We've dabbled over the years at smoking salmon, chicken, and turkey, and in the more complicated and sophisticated realm of curing pancetta and curing and smoking our own bacon.  I finally invested in this amazing cookbook:


I'm so in love with this cookbook.  If you are enamored (as am I) with the art of salting, curing, aging, smoking, preserving food, this cookbook is your Bible, a must-have.

Although I like to consider home-curing and home-smoking bacon and other delectables to be so 2011, so avant garde, I remember my daddy talking about his youth, when slaughtering a pig was a routine part of survival in rural life.  They would hang the various pork cuts in the smokehouse to cure, and they dropped pieces of the pork skin into hot oil, creating the treasured delicacy "cracklings," like what we call pork rinds or chicharonnes. 

There's a Biblical passage in Ecclesiastes that says, "There is nothing new under the sun."  No words could be more appropriate.  When we smoke our own bacon, we're not reinventing the wheel, folks; we're simply getting back to our roots.

Yummo, look at all this beautiful pork belly just waiting to fulfill its bacon destiny!


I was lucky enough to find large, bone-in pork belly portions.  And as a bonus I got to practice my meat fabrication skills.  I think that's the culinary school term for having a lot of fun butchering meat, meat fabrication.  I removed the rib sections from the pork bellies, reserving the ribs for another use, which I'll detail in a later post.


You only need a couple of specialized items to make your own bacon.  You need pink salt, a special salt made for curing and preserving (look for sources online) and it's best to use a food scale for accuracy in weighing your ingredients (you can find very inexpensive food scales -- I found this one at Wal-Mart for around $20).

Basic Dry Cure For Bacon


1 pound/450 grams kosher salt
8 ounces/225 grams sugar
2 ounces/50 grams pink salt

Bacon


One 3- to 5-pound slab pork belly, skin on
Basic Dry Cure for dredging


Trim the belly so that its edges are neat and square.  Spread the dry cure on a baking sheet.  Press all sides of the belly onto the cure to give it a thick uniform coating.


Place the belly in a 2-gallon ziploc bag.  Refrigerate for 7 days, flipping the bag over to redistribute the liquid that will accumulate every other day.


After 7 days, check the belly for firmness.  If it feels firm at the thickest point, it's cured.  If it still feels squishy,  refirigerate it for up to 2 more days, checking it every day.


Remove the belly from the cure, rinse thorougly, and pat dry with paper towels.  Let the bacon rest in the refrigerator, covered, for up to 3 days.


We made one slab of regular bacon and one slab of pepper bacon.  For the pepper bacon, we pressed cracked black peppercorns into one of the pork belly slabs after rinsing.


Prepare the fire in your smoker and smoke the bacon with wood of your choice, such as apple wood, at a very low heat until bacon reaches 150 degrees.

The easiest time to remove the skin is while the bacon is still warm from the smoker.  Be sure to save the smoky skin to flavor a pot of beans.

Both the regular and the pepper bacon are good, but the pepper bacon is probably the best bacon I've ever tasted.

Monday, January 24, 2011

Whole Wheat Applesauce Cranberry Muffin Recipe


This recipe is from examiner.com.  It's definitely kid-tested and kid-approved in our house.  This super easy recipe is a great way to sneak a little healthy fiber into your kids' diets, and it's a nice, simple recipe for the kiddos to prepare with you.  It's absolutely scrumptious!!!


Whole Wheat Applesauce Cranberry Muffin Recipe

1 cup unsweetened applesauce
1/4 cup canola oil
2 tablespoons butter, melted
1/2 cup dark brown sugar
1 egg
1 1/2 cups all-purpose flour
1/2 cup whole wheat flour
3 tablespoons wheat germ
1 teaspoon baking soda
1/4 teaspoon salt
1 teaspoon cinnamon (I highly recommend Penzey's)
1 cup dried cranberries

Preheat oven  to 350 degrees.

In a large bowl, whisk together the applesauce, oil, butter, sugar, and egg.  In a separate bowl, whisk together the flours, wheat germ, baking soda, salt, and cinnamon.  Add the dry ingredients to the wet ones and stir gently with a spatula or wooden spoon just until the mixture is combined -- don't overmix or the muffins will turn out tough.  Stir in the dried cranberries.

Spray a muffin tin with nonstick spray or line it with cupcake liners if you prefer.  Fill each cup about 3/4 of the way to the top.  Bake about 25 minutes, or until a toothpick comes out clean.

Friday, January 7, 2011

Beef Bourguignon Recipe


Keto/Low Carb Update Alert:  Wow, it's been a long time since I've posted!  Since I last posted, four years ago, we started following a keto/low carb way of eating.  I'm making this recipe tonight, but with a few updates to reduce the carbs.  I reduced the amount of carrots and onions.  I'm omitting the flour; the stew will be thick enough on its own.  And no bread for us, although you could certainly have low carb bread if you wanted.

***********************************************************************************

I've seen the movie "Julie & Julia" four times now, and I look forward to seeing it again.  I'm mesmerized by Julie Powell's story.  The movie inspires me to cook and it inspires me to blog.

This recipe is from Ina Garten (The Barefoot Contessa).  I think it's in the "spirit" of Julia Child's Boueuf Bourguignon, but slightly updated for us contemporary "servantless American cooks."  My baby sister-in-law, Joann (who trained at Le Cordon Bleu Dallas, I should add), introduced me to this recipe and assured me that although it requires a bit of effort and time, the result is totally worth the investment.  She is so right.  This recipe is going into the "rotation" here.

I had reservations about using an entire bottle of red wine in the recipe, that the result would be a tannic, sour stew.  Silly me!  How dare I not trust Barefoot when she's channeling Julia.  The wine helps to tenderize and flavors the beef during the cooking process and the result is a mellow, well-rounded, full-flavored stew.  This is one of the best recipes I've ever prepared, so classic and such an upscale comfort food.  I hope you'll give it a try.

When you prepare Beef Bourguignon, be sure to use really good quality bacon and beef, no mystery stew meat.  I skipped the toasted bread at the end of the recipe as my beloved and I are always looking to reduce those carbs that inevitably just end up as cellulite (or as I like to call it here in North Central Texas, hail damage, hahaha) on my thighs.  If "wearing" your carbs isn't a concern for you, serve this dish with the toasted bread or with egg noodles or mashed potatoes.

BEEF BOURGUIGNON

Ingredients:

1 tablespoon good olive oil
8 ounces dry cured center cut applewood smoked bacon, diced
2 1/2 pounds chuck beef cut into 1-inch cubes
Kosher salt
Freshly ground black pepper
1 pound carrots, sliced diagonally into 1-inch chunks
2 yellow onions, sliced
2 teaspoons chopped garlic (2 cloves)
1/2 cup Cognac
1 (750 ml.) bottle good dry red wine such as Cote du Rhone or
   Pinot Noir (I used Mark West Pinot Noir) 
1 can (2 cups) beef broth (obviously if you make homemade
   beef broth, use it in this recipe)
1 tablespoon tomato paste
1 teaspoon fresh thyme leaves (1/2 teaspoon dried)
4 tablespoons unsalted butter at room temperature, divided
3 tablespoons all-purpose flour
1 pound frozen whole onions
1 pound fresh mushrooms stems discarded, caps thickly sliced

For serving:

Country bread or Sour Dough, toasted or grilled and rubbed with garlic clove
1/2 cup chopped fresh parsley, optional

Directions:

Preheat the oven to 350 degrees F.

Heat the olive oil in a large Dutch oven. Add the bacon and cook over medium heat for 10 minutes, stirring occasionally, until the bacon is lightly browned. Remove the bacon with a slotted spoon to a large plate.

Dry the beef cubes with paper towels and then sprinkle them with salt and pepper. In batches in single layers, sear the beef in the hot oil for 3 to 5 minutes, turning to brown on all sides. Remove the seared cubes to the plate with the bacon and continue searing until all the beef is browned. Set aside.


Toss the carrots and onions, 1 tablespoon of salt and 2 teaspoons of pepper in the fat in the pan and cook for 10 to 15 minutes, stirring occasionally, until the onions are lightly browned. Add the garlic and cook for 1 more minute. Add the Cognac, stand back, and ignite with a match to burn off the alcohol.


Put the meat and bacon back into the pot with the juices. Add the bottle of wine plus enough beef broth to almost cover the meat. Add the tomato paste and thyme. Bring to a simmer, cover the pot with a tight-fitting lid and place it in the oven for about 1 1/4 hours or until the meat and vegetables are very tender when pierced with a fork.

Combine 2 tablespoons of butter and the flour with a fork and stir into the stew. Add the frozen onions. Saute the mushrooms in 2 tablespoons of butter for 10 minutes until lightly browned and then add to the stew. Bring the stew to a boil on top of the stove, then lower the heat and simmer for 15 minutes. Season to taste.

To serve, toast the bread in the toaster or oven. Rub each slice on 1 side with a cut clove of garlic. For each serving, spoon the stew over a slice of bread and sprinkle with parsley.

Tuesday, December 21, 2010

Korean Pickles


I'm always delinquent in updating the blog, but I think procrastination is part of my DNA.  Just as an FYI, I was born long past my due date and I've been a top-quality procrastinator ever since!!!  I could win procrastination contests.  If there were a procrastination event in the Olympics I'd be a gold medalist for sure.  I'm going to try to get caught up here because there has been some fabuloso food cooked in our kitchen lately that I want to share with you.  Maybe this New Year's Day my resolution will be to post more often ... or maybe next New Year's Day ...

The following recipe is from singleguychef.blogspot.com .  I've made these savory, crispy pickles twice now.  When I made them I reduced the amount of sugar and increased the amount of salt from the original recipe because in my home we prefer a salty pickle as opposed to a sweet pickle.

The most important thing about this recipe is that you need to use Korean cucumbers if you can possibly find them.  If not, use Kirby cucumbers (also called pickling cucumbers).  Regular cucumbers just don't have the proper snappy crispiness for pickling. 

Korean gochujang (hot chili paste) is available at most Asian markets.  You may see it with different spellings, such as gokujang.  I think it has something to do with the translation from Korean to English.  If the word looks similar, you probably have the right thing.  If you can't find gochujang, you can substitute a few squirts of sriracha sauce.  You've seen sriracha even if you don't realize it; it's that sauce in the squirt bottle with the rooster on the label and the green plastic top that's readily available at most every grocery, even at Wal-Mart. 

For the chili flakes you can use crushed red pepper flakes which are easy to find.  But if you're lucky enough to have an Asian market nearby that stocks Korean staples, use mild or hot Korean red pepper powder, depending upon your taste.  Korean red pepper powder is a lovely ingredient for recipes because it doesn't include the pepper seeds, so it gives you a nice, smooth texture.

These pickles are so easy and so full of flavor.  My mouth is watering just thinking about them!


Ingredients

1 lb. Korean cucumbers or Kirby cucumbers
1 teaspoon kosher salt
1/2 cup sugar
1/2 cup distilled white vinegar
1/4 cup water
1 teaspoon Vietnamese fish sauce
1 teaspoon grated fresh ginger
1 clove garlic, finely minced
1 tablespoon hot chili paste
1 teaspoon chili flakes

Cut cucumbers about ¼-inch thick (leaving on the skin) and sprinkle with kosher salt. Gently work salt through the cucumber pieces with your hand and let sit for 30 minutes. Then rinse quickly under running water and drain in colander.

In a large bowl, mix together sugar, vinegar, water, fish sauce, ginger, garlic, chili paste, and chili flakes. (If you prefer a pickle that is more salty and less sweet, add 1 teaspoon of kosher salt to this mixture and reduce the sugar to 1/4 cup.)  Add cucumbers and then transfer everything into a clean mason jar.

Refrigerate until ready to serve.

Makes about 3 cups of pickled cucumbers.

Sunday, December 12, 2010

My Catering Aspirations

My sis-in-law Leslie and bro-in-law Andy gave me the opportunity to prepare the food for a holiday party they had for their friends in their beautiful new home.  Andy was so kind to take these fabulous pics of the food.

Trio of Dips:

Sundried Tomato Dip (Recipe From Barefoot Contessa)
Tapenade and Feta Dip
Hummus


Baked Figs With Blue Cheese, Candied Bacon, Roasted Pecans, and Reduced Balsamic Vinegar:


Miniature Twice-Baked Potatoes Topped With Crispy Prosciutto:


Vietnamese Chicken Spring Rolls With Nuoc Cham Dipping Sauce:


Grape Tomatoes Filled With Smoked Salmon Mousse, Served on Salted Cucumber Slices and Drizzled With Lemon Caper Vinaigrette:


Stuffed Mushrooms (My Photo):


This was a wonderful opportunity to prepare food for a party.  I hope to have more catering opportunities in the future.


Tuesday, November 16, 2010

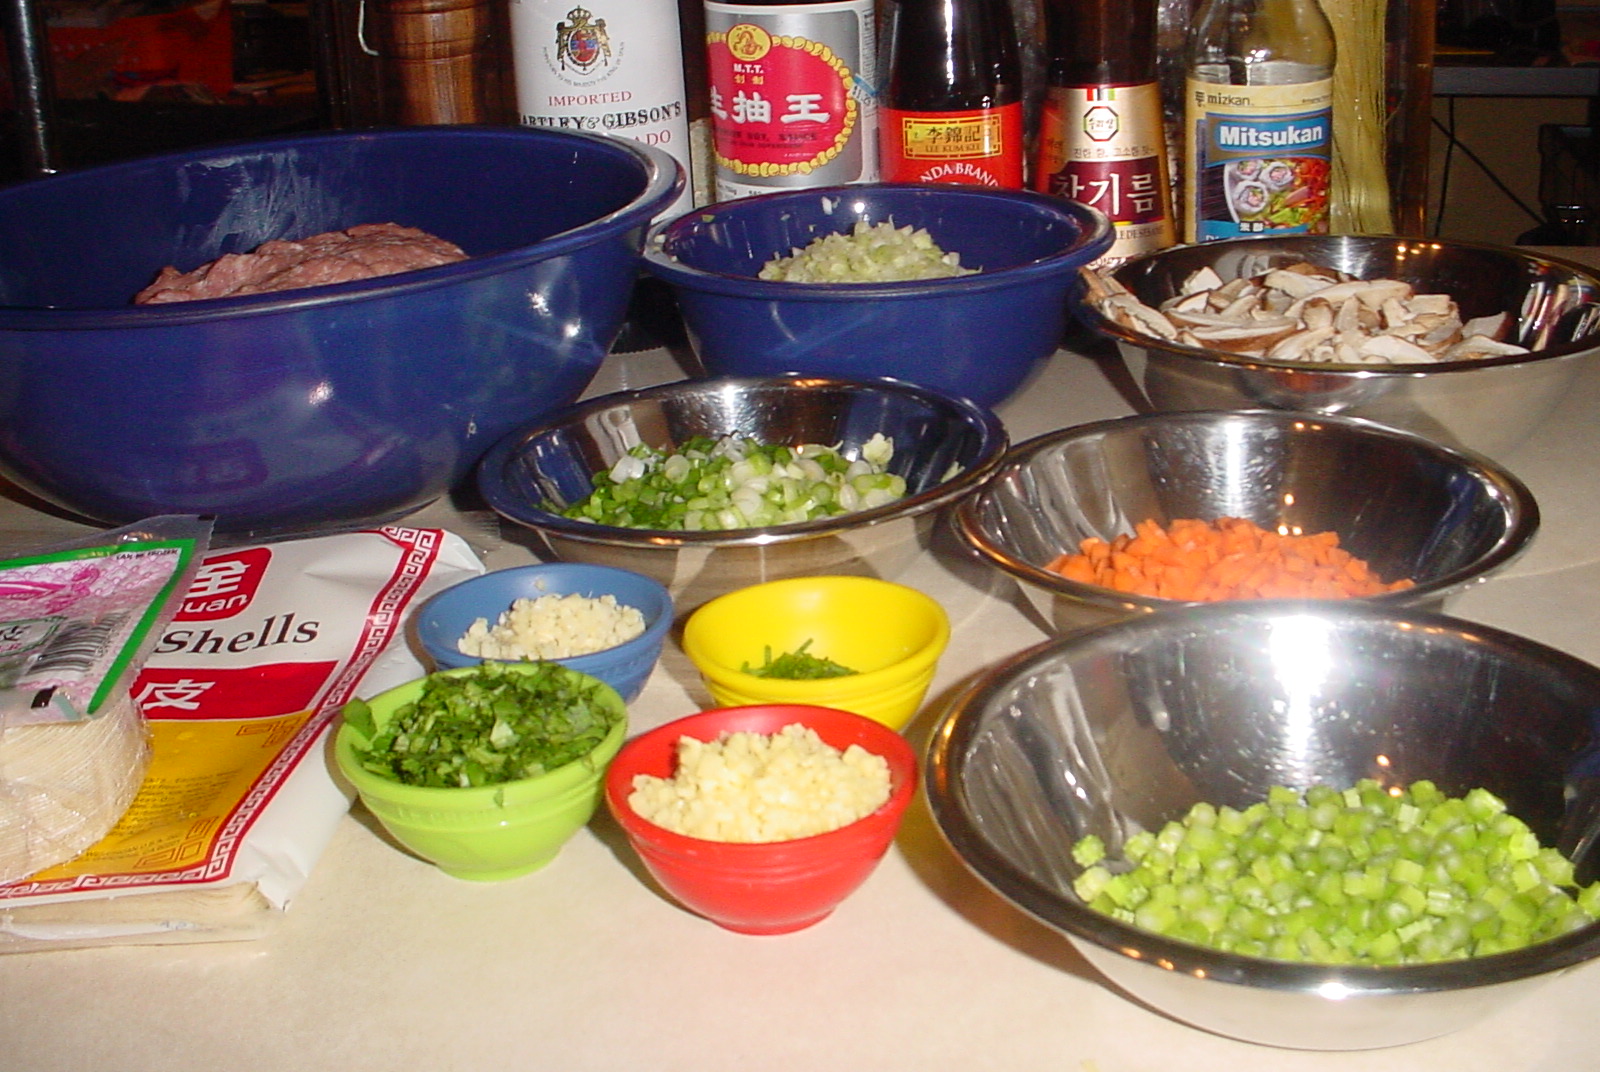
Time-Saving Double-Duty Prep: Recipes For Egg Rolls And Pot Stickers


Both of these recipes are from "The Take-Out Menu Cookbook," by Carla Snyder and Meredith Deeds.  It's one of my favorite cookbooks.  It's a good jumping-off point for dabbling in ethnic cuisines.  The recipes are easy to prepare and yield delicious results.  I've posted the recipe for Fried Rice from this cookbook before.  I recommend preparing the Egg Rolls and Pot Stickers at the same time because, one, they use many of the same ingredients so you can easily prep the ingredients for both recipes at once, and two, you can freeze the extras from both recipes to prepare later and have homemade Chinese takeout night anytime.

Don't let the long ingredient lists for these recipes deter you.  Most of the ingredients are easy to find.  Nowadays you can even find egg roll wrappers and dumpling wrappers at Walmart.  You might need to visit an Asian market for a few of the specialty ingredients, such as oyster sauce or toasted sesame oil.  Just go down the lists of ingredients for the two recipes, prepping each ingredient and portioning each into prep bowls.  Then you're ready to begin cooking.


EGG ROLLS

2 tablespoons oyster sauce
1 tablespoon soy sauce
1 tablespoon Asian toasted sesame oil
1 teaspoon sugar
1/2 teaspoon salt
1/4 cup vegetable oil
1 (1-inch) knob fresh ginger, peeled and minced
3 garlic cloves, minced (1 tablespoon)
1 bunch green onions, white and light green parts only, thinly sliced
1 rib celery, minced (1/2 cup)
1 carrot, minced (1/2 cup)
10 shiitake mushrooms, stems discarded and caps thinly sliced
1/2 head of napa or Chinese cabbage, thinly sliced (2 cups)
1 pound raw shrimp, peeled, deveined, and diced
1/2 pound ground pork
1 (16-ounce) package egg roll wrappers
1 egg, beaten
2 to 3 cups peanut or vegetable oil, for frying
Chinese mustard, plum sauce, or sweet chile sauce, for serving

Combine the oyster sauce, soy sauce, sesame oil, sugar, and salt in a small bowl and set aside.

Heat the vegetable oil in a large skillet set over medium heat.  Add the ginger, garlic, green onions, celery, carrot, and mushrooms and saute for about 3 or 4 minutes, or until they soften.  Add the cabbage and saute for another minute or two.  Add the shrimp and pork and cook, tossing and stirring vigorously, for about 2 minutes, or until they are cooked through.

Add the reserved sauce and toss to incorporate.  Remove from the heat and set aside until cool to the touch.

Cover the egg roll wrappers with a piece of plastic wrap.  Place 1 wrapper on a work surface with one point facing you.  Spread 1/4 cup of the filling horizontally across the lower third of the wrapper.  Fold the bottom point over the filling, tightening the wrap over the filling, and fold in the side corners.  Brush the top corner with the egg wash and roll up the wrapper tightly, sealing the roll closed.  Transfer the rolls as they are made to a parchment-lined sheet pan and cover loosely with plastic wrap.  Fill the rest of the wrappers in the same manner.

Preheat the oven to 200 degrees.

In a wide, heavy pot, heat 2 inches of oil to 360 degrees over medium heat.  Carefully add 4 egg rolls to the oil and fry, turning them with a slotted spoon after about 2 minutes as they brown on the bottom.  Fry on the second side for another 2 minutes, or until they brown.  Transfer the egg rolls to a sheet pan lined with a double thickness of paper towels.  Fry the remaining egg rolls in batches of 4.  When they are all browned, the egg rolls can be kept warm in the oven for up to 30 minutes.  (Kearby's Note:  When we prepared these, we heated 5-6 inches of oil to 360 degrees and deep fried the egg rolls.  We fried them for about 4-5 minutes, until golden brown.)

Serve hot with Chinese mustard, plum sauce, or sweet chile sauce.

MAKE AHEAD:  The egg rolls can be assembled but not cooked, covered, and refrigerated for up to 8 hours or frozen for up to 1 month.  Thaw at room temperature for 3 hours before frying.  (Kearby's Note:  We have frozen, thawed, and cooked leftover egg rolls and they were awesome!  Freeze in a single layer on the parchment-lined pan, not quite touching.  Once frozen, remove to a ziplock bag, label, and return to the freezer.)


POT STICKERS

1/2 head of napa or Chinese cabbage, finely chopped (2 cups)
1 pound ground pork
1/2 green onion, minced (2 tablespoons)
2 tablespoons soy sauce
2 tablespoons minced cilantro
1 (1-inch) knob fresh ginger, peeled and minced
1 tablespoon minced fresh chives, plus more for garnish
1 tablespoon rice wine or dry sherry
1 tablespoon Asian toasted sesame oil
1 teaspoon light brown sugar
1 teaspoon salt
1/4 teaspoon freshly ground black pepper
1 garlic clove, minced
1 (12-ounce) package dumpling wrappers or wonton skins, cut into rounds
1/4 cup peanut or vegetable oil
1 cup chicken stock

Dipping Sauce

1/4 cup soy sauce
2 tablespoons rice vinegar
1 teaspoon minced fresh ginger
1/4 teaspoon chile oil
1 garlic clove, minced


In a large bowl, combine the cabbage, pork, green onion, soy sauce, cilantro, ginger, chives, rice wine, sesame oil, brown sugar, salt, pepper, and garlic.  Work the ingredients with your hands until completely mixed.  Heat a frying pan over medium heat and fry a tablespoon of the mixture to check the seasoning.  Adjust the seasoning as necessary.

Cover the dumpling wrappers with a damp towel.  Place one wrapper on a work surface.  With a finger dipped in water, dampen the edges of the wrapper to help it adhere.  Place about 1 tablespoon of the filling into the center of each wrapper and fold it into a half-moon-shaped pouch.  Make 3 or 4 pleats at each edge to gather the dough around the filling, and then pinch around the top of the dumpling to seal it tightly.  Arrange the dumplings on a parchment-lined sheet pan.  Assemble the remaining dumplings in the same manner.

Heat a large frying pan with a tight-fitting lid over medium-high heat and add the oil.  When the oil is hot, add the dumplings to the pan and fry them on one side until browned, about 3 minutes.  Shake the pan to move them around during cooking and keep them from sticking.  Add the chicken stock to the pan and cover the pan tightly so that the pot stickers steam and cook through.  Cook for about 5 minutes, or until the liquid has evaporated from the pan.

(Kearby's Note:  It's important not to overcrowd the pan during the frying/browning step.  Fry in stages if necessary, removing any stuck-on bits from the pan and adding additional oil between batches if necessary.  After all pot stickers have been fried, then return all to the pan and proceed with the steaming step.)

To make the dipping sauce:  Combine the sauce ingredients in a small bowl.  Let the sauce sit for at least 5 minutes to let the flavors blend.

Transfer the dumplings to a heated platter, garnish with chives, and serve with the dipping sauce.

MAKE AHEAD:  The dumplings can be frozen, uncooked, for up to 1 month and cooked directly from the freezer.  Any unused sauce should be refrigerated and discarded after 2 days.  (Kearby's Note:  Use the same instructions for freezing these as the egg rolls.)

Stuffed Mushrooms


These are hands-down the best stuffed mushrooms ever, and once you make them for family and friends they'll be requesting them for every event!  It's really easy to do most of the prep the day before, in fact you'll achieve the best results if you do.


Ingredients:

1 1/2 pounds medium-size fresh mushrooms (all approximately the same size)
6 slices bacon
1/2 cup minced bell pepper
1/2 cup minced onion
6 ounces cream cheese
2 tablespoons Worcestershire sauce
salt and freshly ground black pepper to taste
3/4 cup bread crumbs (homemade or store-bought bread crumbs or Panko crumbs)
2 tablespoons butter
2 tablespoons chopped fresh parsley


The Day Before Serving Day:

Put the bacon in the freezer to firm up.  It's easier to dice that way.  Remove the cream cheese from the fridge to soften.

Clean the mushrooms and let them dry well on paper towels.  Trim off the very ends of the stems (throw the trimmings in your veggie freezer bag for veggie broth later) and separate the stems carefully from the caps.  Line a gallon-size ziplock bag with a paper towel.  Gently lay the mushroom caps on the paper towel in the ziplock in a single layer.  Use more than one ziplock bag if necessary.  Seal the bag and put the mushrooms in the fridge.

Finely dice the mushroom stems.

Remove the bacon from the freezer.  Use a very sharp knife to dice the bacon.

Cook the diced bacon, minced bell pepper, and minced onion in a skillet over medium heat until the bacon is partly cooked but not crisp and the bell pepper and onion are crisp-tender.  Pour into a strainer and drain off grease and liquid.  Transfer bacon mixture to a storage bowl (with a lid), add diced mushroom stems, softened cream cheese, Worcestershire sauce, and salt and pepper to taste.  Mix well while still warm.  It's easiest to mix with a fork.  Put the lid on the storage bowl and refrigerate the filling.


Serving Day:

Preheat oven to 300 degrees.

Remove mushrooms and filling from fridge.  Arrange mushroom caps in a single layer on an oven-safe platter (not your final serving platter).  Fill mushroom caps with the filling.  The easiest way to fill them neatly and evenly is to use a cookie scoop.

Put the platter of filled mushrooms in the oven for approximately 30 minutes, checking them every 10 minutes.  You'll be able to see and smell when it's time to remove the mushrooms from the oven.  Their texture will look different, they'll release some moisture, and they'll start to smell like, well, mushrooms.

Remove from oven and set aside to cool.

Increase oven temperature to 375 degrees.

Melt the butter.  Stir the chopped parsley into the bread crumbs.  Add the melted butter and mix well using two forks.

When the mushrooms are cool enough to handle, gently press a small palmful of the bread crumbs to the top of each mushroom, covering the filling with a mound of crumbs.  Place the mushrooms on an oven-safe serving platter.  Return to the oven and bake just until bread crumb topping is golden brown and crispy, about 5 to 10 minutes.  Keep a close eye on them; the difference between golden brown and shrieking smoke alarm is about 2 seconds!

Note:  If you want to prepare the mushrooms at home and serve them somewhere else, after putting the bread crumbs on the mushrooms, wrap the platter tightly with plastic wrap.  At the serving location, remove plastic wrap and heat mushrooms at 350 degrees until the mushrooms are hot and the crumbs are golden brown and crispy, about 20 to 30 minutes.  Again, keep a close eye on them.

And One More Note:  We always intentionally increase the measurements of the filling ingredients so that we have extra filling left over.  The extra filling is decadently good rolled up in an omelet.