My recipes are meant to be shared and enjoyed. I welcome you to re-post my recipes and text. I ask only that you credit me and include a link to my blog if you post any of my content.

Tuesday, May 25, 2010

Yummy Homemade Lasagna

Always searching for ways to sneak nutrition, namely in the form of veggies, into our very picky carnivore/carbivore kids, here's a recipe we've created for lasagna made with a tomato sauce that's filled with veggies.  The flavor is incredible and the kids will never guess that it's healthy.  Plus you can reserve part of the sauce for homemade pizza.  This isn't a quickie recipe.  You'll spend several hours in the kitchen.  But for your effort you'll be rewarded with two super nutritious lasagnas, one to bake now and another to freeze or share, plus sauce for homemade pizzas.  Feel free to adjust the recipe to your taste or to use what you have on hand.  It's a great way to use up bits and dabs of veggies that are lingering in the veggie drawer in your fridge.  And as always, don't forget to throw all the scraps and trimmings into a freezer bag to make veggie broth.

Recipe For Homemade Lasagna Plus Yummy Pizza Sauce
3 beets, peeled and diced*
2 zucchini squash, sliced into spears
2 onions, large dice
6 tomatoes, peeled, cut in half, and most seeds removed
1 bell pepper, diced
1/2 pound mushrooms, cut in half
4 celery stalks, cut in chunks
2 carrots, cut in chunks
1/4 small cabbage, shredded
2 heads garlic, minced
2 teaspoons Italian seasoning (I like Penzey's Pasta Sprinkle http://www.penzeys.com/cgi-bin/penzeys/p-penzeyspastasprinkle.html )
1 teaspoon kosher salt
1 teaspoon freshly ground black pepper
Olive oil for spraying the pan and olive oil for drizziling over veggies
2 pounds ground chuck
1 pound sweet Italian sausage (either bulk or removed from casing)
1 28-ounce can crushed tomatoes
1 28-ounce can diced tomatoes
2 cups Pinot Grigio
5 or 6 garlic cloves, finely chopped
1 bunch of chopped basil, divided use
1 bunch of chopped parsley
1 bunch of oregano (leaves removed from stems)
2 1/2 pounds mozzarella (preferably whole milk which melts better)
32 ounces ricotta
3 large eggs
10 ounces parmesan cheese
2 packages of no-boil lasagna noodles (we like Barrilla) (you'll probably have some left over)

Use two cookie sheets or cake pans lined with aluminum foil.  Spray with olive oil if you have a Misto sprayer or spray with Pam.  Arrange prepared veggies over the two cookie sheets.  Sprinkle with the Italian seasoning, salt, and pepper, and drizzle with a couple tablespoons of olive oil.

Roast in oven for 1.5 hours at 350 degrees.  Stir veggies, return to oven, and raise temperature to 375 degrees.  Roast for 1/2 hour to 1 hour, checking regularly, until there's no liquid in pans and veggies are just starting to brown and caramelize.

*  When you're working with red beets be sure to use a cutting board that can be put through the dishwasher, rather than your best wooden cutting board, and wear gloves.  Those things stain like crazy.  Another option is to use golden beets instead of red.


While veggies are roasting, you can brown the ground chuck and Italian sausage together in a large cast iron skillet.  Drain off the fat in a colander.

Allow roasted veggies to cool.  Puree in batches in food processor and pour into a Dutch oven or other similar large pot.  Add both cans of tomatoes, the Pinot Grigio, the oregano leaves, half of the chopped basil, and the 5 or 6 cloves of chopped garlic.  Taste for seasoning and add salt and freshly ground pepper to taste.  Cook at a high simmer/low boil until reduced to sauce consistency.

At this point reserve and refrigerate 1 to 2 cups of tomato sauce to use for homemade pizza.

To the remaining tomato sauce add the browned meat mixture.  Simmer for a few minutes to meld flavors.

Shred your mozzarella.  An easy way is to pop it into the freezer for half an hour and then shred in the food processor with the grater blade attachment.

Shred or grate your parmesan.

In a large mixing bowl combine shredded parmesan, ricotta, eggs, parsley, and remaining basil.  Mix well.

Use 2 rectangular lasagna dishes, 9-by-13 or thereabouts.  Ladle a small amount of tomato/meat sauce into the bottom of each dish and spread it out.  Cover with lasagna noodles (probably 3 will cover the pan).  Next add some of the ricotta mixture and spread as evenly as possible over the noodles.  The easiest way I've found to do this is to use a small ice cream scoop, aka a cookie scoop, to put a little ricotta mixture on each noodle, then spread with a spatula.  Next add a layer of tomato/meat sauce, spreading it as evenly as possible.  Next add a layer of shredded mozzarella.  Each layer should be minimal, just enough to cover the previous layer.

Continue layering noodles, ricotta, sauce, and mozzarella until you reach the top of the lasagna dishes, ending with mozzarella.


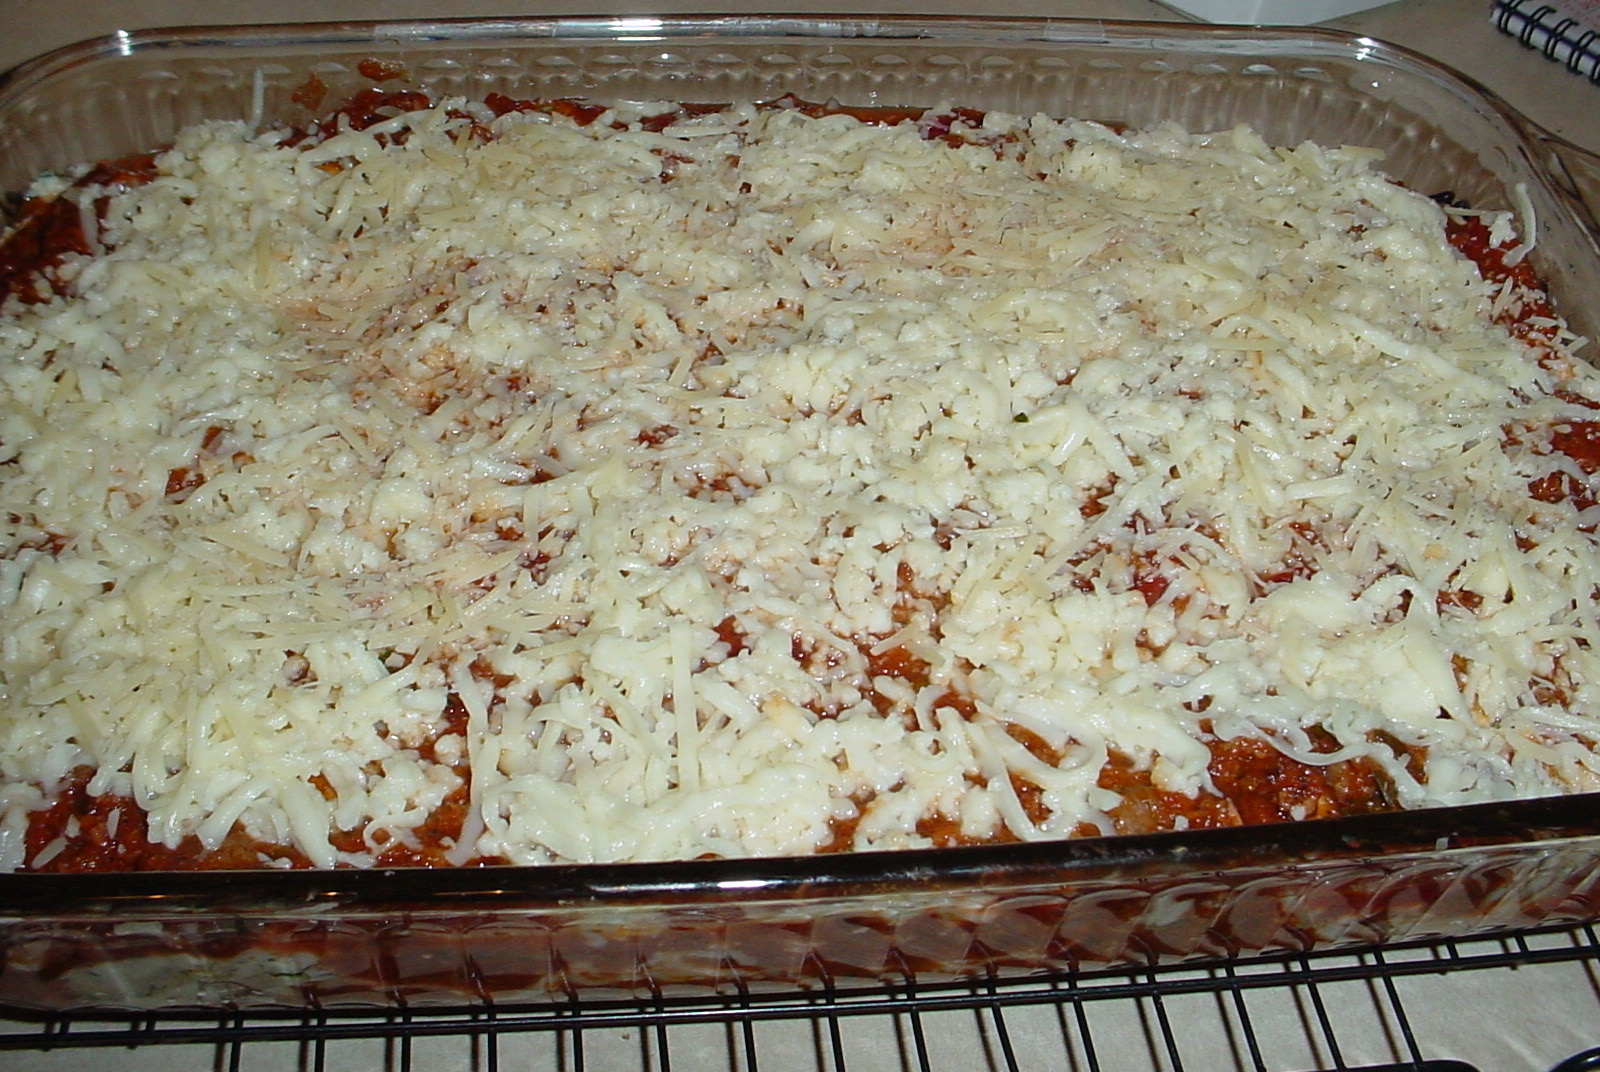
For the lasagna you wish to serve right away, cover tightly with aluminum foil and cook in a 350 degree oven for an hour, then remove the foil, increase the temperature to 375 degrees, and cook for about 30 minutes, checking regularly, until the cheese is bubbly and golden brown.


This dish freezes really well.  You can freeze the second lasagna, tightly wrapped.  When you're ready to bake, just thaw, and bake using the same instructions.

Wednesday, May 19, 2010

This Gringa's Take on Arroz con Pollo


So I know kind of instinctively what arroz con pollo is all about, although I've never actually tasted the dish.  I have seen it prepared on numerous cooking shows on TV and read so many recipes for it.  My spirit, which imagines that it's Latina, although in truth I'm Scotch-Irish, German, and Native American, among other things, believes that it understands the essence of this quintessential Latin American dish.  All this is by way of explanation that the following recipe, although absolutely scrumptious, if I do say so myself, makes no claims to be precisely traditional nor authentic to any Latin American region.

Arroz con Pollo

2 or 3 tablespoons olive oil to coat pan
3 1/2 ounce package Goya chorizo  (Spanish style chorizo, not Mexican style), thinly sliced
1 tomato, diced
1 large yellow onion, diced
1 head of garlic, minced
1 to 1 1/4 pound boneless skinless chicken thighs, rinsed, trimmed of excess fat, and dried
1 cup homemade vegetable broth or water
18 ounces beer (1 1/2 cans)
2 Knorr chicken bouillon cubes
1 Goya sazon packet
2 ounces capers, rinsed and drained
14-ounce package Goya valencia style rice, rinsed and drained
2-3 ounces pimientos, diced
1 cup frozen green peas
3 ounces manzanilla olives, cut in half

Heat a large cast iron frying pan or traditional Puerto Rican-style aluminum caldero over medium heat.  Add olive oil.  Add chorizo, tomato, and onion.  Cook over medium heat until onion is softened.  Add garlic and then add chicken pieces, nestling each piece into the bottom of the caldero.  Cook over medium heat until chicken thighs release easily from pan, then turn thighs over.  Again cook until chicken thighs release easily from pan.

At this point add 1 cup vegetable broth or water, the 2 Knorr chicken bouillon cubes, 18 ounces beer, and 1 packet of Goya sazon, and stir to mix.

Bring to a simmer, then add the rice and capers and stir to mix.  Simmer until most of the liquid is absorbed .  Then using a spatula or large spoon gently fold over all the rice.

Add half of the olives, pimientos, and peas.  Cover the caldero with a lid and cook at very low temperature for 20 minutes.  Again fold over the rice with a spatula or large spoon.


Add the remaining olives, pimientos, and peas.  Continue cooking at very low temperature with lid off about 10 minutes until any remaining liquid is absorbed and rice is tender.

Fish Tacos


We prepared some very tasty fish tacos recently, which turned out to be un-tacos, I guess, because we didn't end up wrapping them in the tortillas, but they were darn good nonetheless.  We fried up some tilapia fillets coated with a smoky, spicy batter, served them with fresh, crispy veggies, and drizzled on a citrusy dressing.

I read in a Cooks Illustrated magazine article that there's something that gives catfish and tilapia a "dirt" flavor.  They said to soak catfish or tilapia in buttemilk to eliminate the problem.  It seemed to work really well in this recipe.

Fish Tacos

Fish
3 tilapia fillets
enough buttermilk to soak the fillets (about 2 cups)
Peanut oil or vegetable oil for frying

Dredge
1/2 cup flour

Batter
1 cup flour
2 eggs
1 can or bottle of beer
2 tablespoons salt
1-2 tablespoons chipotle chile powder (depending on how much heat you like)
1 tablespoon freshly ground black pepper
1 tablespoon garlic powder

Sauce
Zest and juice of 2 limes
Juice of 1 pomelo *
Juice of 1 ripe tomato
2-3 tablespoons pomegranate vinegar *
salt to taste
freshly ground pepper to taste
Tabasco sauce to taste

Veggie Fillings
Shredded Cabbage
Thin Sliced Radishes
Thin Sliced Green Onions
Chopped Cilantro
Any other veggies you'd like with your fish tacos


Rinse your tilapia fillets and place in a shallow dish.  Pour buttermilk over tilapia.  Refrigerate and turn the fish over with tongs every few hours to be sure it's evenly soaked in buttermilk.

Get your batter station ready.  Put the 1/2 cup of flour in one shallow bowl.  Prepare the batter in another bowl by wisking the egg, adding the flour, spices, and beer, and wisking to combine.

Heat oil in a saucepan.  I like to use a small saucepan so as not to use much oil and therefore I cut the filets into smaller portions.  You can tell that the oil is hot enough when a sprinkle of flour "sizzles" in the oil.

Remove the fillets from the buttermilk.  Cut your fish filets if necessary so they'll fit into the  pan in which they'll be fried.  Dredge each piece of tiplapia in the plain flour.  Dip into the batter, then lift out of the batter and let the excess drain away a bit.  Then gently lower into the cooking oil.  Cook for a couple of minutes, until nicely golden brown, turning one or twice during the cooking.  A spatter guard is a really good idea to help prevent "fried kitchen" when you're frying the fish!

* Frugality is the name of the game.  Frugality doesn't necessarily mean cooking cheap, but it does mean cooking smart, using everything and not wasting anything.  We love to cook and we enjoy searching for great ingredients.  We're also blessed to live in Carrollton, Texas, which is in the middle of the Dallas-Fort Worth Metroplex, and which is becoming a mecca for ethnic food markets.  For us it's easy and frugal to have ingredients on hand that some cooks might consider exotic.  If you don't have easy access to international markets or you don't cook frequently, substitute juice from an orange or grapefruit for the pomelo juice and substitute red wine vinegar for the pomegranate vinegar.  It's just a waste to spend big bucks and extra effort procuring specialty ingredients unless you'll really use them.

Beyond Ultimate Hummus

I'm editing this recipe because if you use canned garbanzo beans you can't control the sodium level and you don't know how much salt is in the can.  Therefore, I can only recommend making hummus from dry garbanzo beans that you soak and cook yourself.

Hummus decorated with kalamata olives and homemade oven-dried tomatoes.
I know I've posted about hummus a couple of times already. I'm kinda addicted to it. I've been trying to perfect the recipe and get a really smooth and creamy result. Well, my hubby watches some funny/interesting youtube videos made by this crazy, foul-mouthed Canadian cooking guy. We saw his videos about making hummus and I learned the secret for making the best, creamiest hummus. The secret is removing the skins from the garbanzo beans/chickpeas.

If you want to check out the youtube videos, here are the links. Warning, these videos are definitely NSFW (not safe for work) and not for anyone offended by adult language. Part 1: http://www.youtube.com/watch?v=QZoRNfGgZM0 Part 2 http://www.youtube.com/watch?v=Wdu3xTbHHJg

If you're going to the trouble of making the perfect hummus recipe, why not do it all the way, and use dry garbanzo beans. It's super affordable and it's not at all difficult to start with dried beans. You just have to plan ahead.

This recipe will make about 3 cups of hummus:

1 1/2 cups dry garbanzo beans/chickpeas
1/4 teaspoon baking soda
2 Knorr chicken bouillon cubes
6 tablespoons fresh-squeezed lemon juice
6 tablespoons tahini (ground sesame seed paste)
2 tablespoons garlic, pressed through a garlic press or finely minced
1/4 teaspoon ground cumin
1/8 teaspoonn ground cayenne pepper
6 tablespoons olive oil (use more or less to achieve the texture you like)

Two days before you plan to serve the hummus, rinse and sort the garbanzo beans. Cover them with plenty of water (they'll swell to almost twice their size) and soak for 12-24 hours.

The next day drain off the soaking water. Put garbanzos in a heavy-bottomed pot with 2-3 quarts of water and the baking soda. Bring to a boil. Reduce heat to a very low boil and cook until you see a lot of the skins starting to come off of the beans. Be sure to check and stir the beans at least every 30 minutes while they cook, adding water if necessary. The cooking time varies greatly depending on how fresh your garbanzos are.

When you see lots of garbanzo skins floating in the cooking water, but while the garbanzos are still intact, remove from heat, drain beans and add cold water. Continue to drain and add cold water until the beans are cool enough to handle in the water. With your hands, swish the beans around in the water and rub the beans to get the skins to come off. Remove the skins from the water. The more skins you remove, the smoother and creamier your hummus will be. This step takes a little time, but it's so worth it for the smooth-as-silk finished product.

Return the beans to the stove with a small amount of water, just enough to cover the beans, and add the chicken bouillon cubes. Gently stir and simmer until almost all of the water has evaporated and the beans are falling apart. Remove from heat, allow to cool to room temperature, then pour the garbanzos and any remaining cooking water into a food processor.  Add the lemon juice, tahini, garlic, cumin, and cayenne. Process until very smooth. With the food processor running, slowly drizzle in the olive oil until the hummus reaches the consistency you want.  As you drizzle the olive oil, the mixture will sort of emulsify, similar to making mayonnaise, and the consistency will change and become creamier.

Transfer the hummus to a bowl, drizzle with olive oil, and sprinkle with finely chopped parsley and/or cumin or paprika if desired.  Serve with kalamata olives and pita chips, veggie sticks, or crackers.